


 Saffron V70 R
 Saffron V70 R
 Saffron V70 R
Super thread and very in-depth! it's always good when you have pictures to relate too
Results 81 to 100 of 160
Thread: my 940 aka 'the barge'
-
Tuesday 4th February 2014, 14:46 #81Senior Member
 Clueless about Cars
- Join Date
- Sep 2009
- Location
- Just outside of Oxford
- Posts
- 2,868
- Thanks
- 3,314
Thanked 1,024 Times in 747 Posts

-
Thursday 13th February 2014, 12:19 #82Member
This user has no status
- Join Date
- May 2011
- Posts
- 76
- Thanks
- 0
Thanked 14 Times in 12 PostsAre you still looking for a cam? I have a VX3 which is a pretty nice improvement over a T cam (I made 280whp with it) if you want it?
On the potential of an 8v head you need to look at this thread http://www.turbobricks.org/forums/sh...d.php?t=286614
Slightly ported head (531) stock valves, reground cam and made 673hp
The Holset HX50 @38psi might have helped though.
-
The Following User Says Thank You to 7mgtesup For This Useful Post:
artfulflounder (Friday 14th February 2014)
-
Tuesday 25th February 2014, 23:42 #83Senior Member
no experience but has
enthusiasm aplenty
- Join Date
- Aug 2013
- Location
- norwich
- Posts
- 261
- Thanks
- 239
Thanked 120 Times in 91 PostsAbout time a posted some more progress.......carrying on with the cylinder head.
Here is the standard volvo 530 cylinderhead.
1st pic says exactly what it is and the second pic show manufacturing date of 22/05/1995.


Now some before pics of the bowls.


Most of the work in the bowls will be smoothing out the waisted/stepped section in the bowls and the short side radius. The exhaust ports although can't be seen in the pics have the same shelf in the ports so i'm hoping that i can smooth the bowls and widen the arch to assist with flow.
Also going to be carrying on with the gasket matching.


I have actually carried out a good 12hrs work on the ports so far as it stands. Got good basic shape and did a little bit on each port before moving to the next to try and make them all potentially flow the same.
But i've not had time to put the pics up yet.
hopefully will have time to update again tomorrow.
-
The Following User Says Thank You to artfulflounder For This Useful Post:
smithy (Wednesday 26th February 2014)
-
Thursday 27th February 2014, 12:31 #84Senior Member
no experience but has
enthusiasm aplenty
- Join Date
- Aug 2013
- Location
- norwich
- Posts
- 261
- Thanks
- 239
Thanked 120 Times in 91 PostsHere's the first update on the port bowls.
Intake bowls: The main restriction with the 8v head has already shown to be the valve size. As i don't have funds to fit larger valves at this time the work on the intake bowls has largely been smoothing the waisted area and smoothing the transition between bowl and runner.
The pics below are work in progress and have been further worked on but these give an idea of what i think i'm trying to do.


Have done some more work smoothing the arch into the bowl and also gasket matched the runner.
Need to complete the bowl and runner to 180 grit.
So far so good? what do you guys think?
-
Thursday 27th February 2014, 13:14 #85Senior Member
228k and still not broke it!
- Join Date
- Jul 2011
- Location
- Poole, Dorset
- Posts
- 23,213
- Thanks
- 6,548
Thanked 7,752 Times in 5,648 PostsGood work there mate, watching with interest
19t, greens, 3" inlet, 3" downpipe with race cat, V70R catback, autotech map...
310.2bhp / 333ft/lb
2016 Swedish Day UK "Best Modified Swede"
SOLD
Got an old discovery now.
-
Thursday 27th February 2014, 19:47 #86Senior Member
no experience but has
enthusiasm aplenty
- Join Date
- Aug 2013
- Location
- norwich
- Posts
- 261
- Thanks
- 239
Thanked 120 Times in 91 PostsThe intake bowls although have taken a while with smoothing the exhaust bowls are a nightmare.
So little room to get in there properly and requiring a bit more work than the intake.
Exhaust bowls:This was just the result of the first stage.


I've done alot more work on the transition from the arch to the bowl and runner. Widened the side and rounded them off alot more. So expect another few update pics.
The bowl floors have a lot of variants in with regards to depth and valve stem guide height so still got to clean that up.
These will also be polished alot more than the inlet side and try to make the runners as smooth as possible.
So these 2 last updates are a couple of days behind were i currently am but hopefully by the weekend i should be finished the bowl work.
-
The Following User Says Thank You to artfulflounder For This Useful Post:
smithy (Thursday 27th February 2014)
-
Saturday 1st March 2014, 18:36 #87Senior Member
no experience but has
enthusiasm aplenty
- Join Date
- Aug 2013
- Location
- norwich
- Posts
- 261
- Thanks
- 239
Thanked 120 Times in 91 PostsBeen a busy bee in the man cave......
Few more pics on the updates, tried to get some better shots, hope they're better.
Intake:
See in the first pic where i've done a bit more to raise the arch and widen the transition area.
Also completed the gasket matching and smoothed the runner but only to 120 grit. Stops fuel droplets dropping out the flow and adds a boundary layer for lubricating the air down the runner apparently.
Just trying to get my head round this flow thing, air mass and velocity of flow 2 different things from what i can see, so for an auto i want responce with bottom end /mid-range which would need flow velocity, rather than greater air mass for outright topend. ???? Anyway i've kept the runner diameter pretty standard and just gasket matched and smoothed off any casting marks.
Wish i'd taken the time on research to do a basic home made flow bench and actually have some data to back up any work i've done. First time for any head work and will have no idea till its back together whether i will see any improvements.


Exhaust:
Done alot more work on the exhaust side with regards to the port and the runner.
Widened the transition from arch to bowl quite a large amount and raised the short side radius. Polished the runners upto 320 grit so far, might leave it at this as not going to see massive improvements due to keeping standard valves.....I've probably done far more than i needed to for a daily driver but it seemed an ideal time to give it a try.


Still not finished yet, will post up further updates as i can.
cheers peeps.
-
Friday 7th March 2014, 10:56 #88Senior Member
no experience but has
enthusiasm aplenty
- Join Date
- Aug 2013
- Location
- norwich
- Posts
- 261
- Thanks
- 239
Thanked 120 Times in 91 PostsCompleted all the work I'm going to do on the head now.
Made a heath robinson washer tank with my neighbours recycling bin.He never used it anyway.lol
Also had it skimmed....so presently all ready for reassembly. Yay.
I also pinched his black vegetable bin as it looks ideal to be trimmed down and used for my cone filter heat shield.
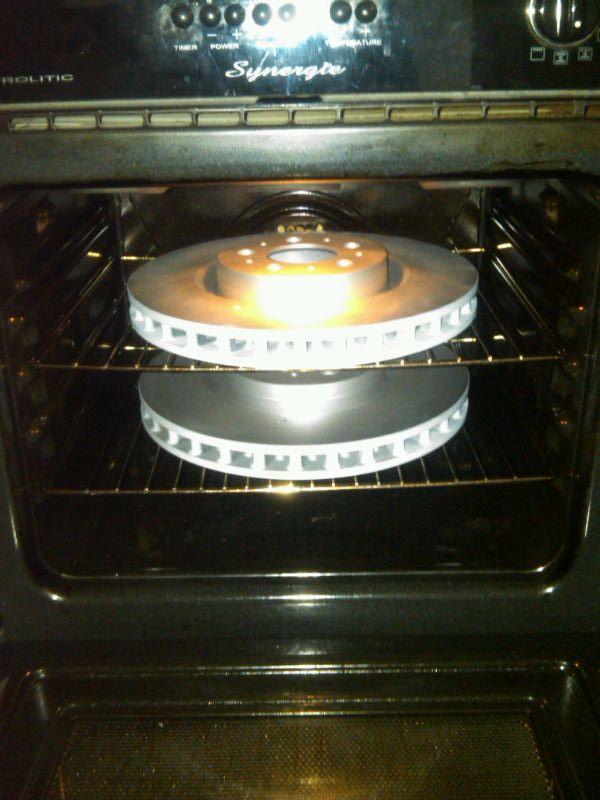
Now a tale of warning for you all.
If your misses tells you that she is going shopping with her friend and wont be back till late afternoon, dont think that you can put your freshly painted 1000°c engine bits in the oven to cure.
Its all a lie, she will come home several hours early and catch you then make you clean the kitchen to get rid of the smell as it hasn't had time to dissipate.
But its o.k as you can feel rather smug while doing it satisfied with that your parts came out well.
-
The Following User Says Thank You to artfulflounder For This Useful Post:
jamesy12345 (Friday 7th March 2014)
-
Friday 7th March 2014, 11:08 #89Senior Member
Keeping it looking stock
- Join Date
- Mar 2012
- Location
- Newton abbot, Devon
- Posts
- 5,567
- Thanks
- 920
Thanked 1,581 Times in 1,296 PostsBeen their and done it.think it was 70 degrees for an hour and a half Originally Posted by artfulflounder

Last edited by Harvey; Friday 7th March 2014 at 11:11.
-
Friday 7th March 2014, 11:49 #90Senior Member
no experience but has
enthusiasm aplenty
- Join Date
- Aug 2013
- Location
- norwich
- Posts
- 261
- Thanks
- 239
Thanked 120 Times in 91 PostsI did 30mins at 100 then 30mins at 200.
Still got a final bake but I'll do that on the car.lol
-
Thursday 13th March 2014, 21:44 #91Senior Member
no experience but has
enthusiasm aplenty
- Join Date
- Aug 2013
- Location
- norwich
- Posts
- 261
- Thanks
- 239
Thanked 120 Times in 91 PostsCan sort of see me making huge steps to getting the old girl back together.
The head has been thoroughly cleaned/degreased, skimmed and lapped the valves.
Valves fitted with new stem seals and hushers.

Cheers to Paul for the vx3 cam.

VX3 Cam: Info from Anthony hyde.
This cam is featured in an old Volvo competition catalogue (the 'BLUE book' being mated to the 531 head and B230FB engine), but is not a 'competition' cam. Most agree its soft down low, but has a very sweet and flexible mid range. It pulls about 500 rpm further than other 'Volvo" cams to around 5,600 rpm and will continue to rev to 6,300 rpm, but the last 700 rpm step is slow (can depend on valve spring condition).
VX3 Spec - 11.37mm intake lift, 10.5mm exhaust lift, Intake opens at 7.7deg BTDC, has some overlap and opens the valves between 1.5 and 2 mm wider. Exhaust Opens 50.1 deg BBTC. VX3 cam has assymetric lobes, unlike the "K" cam. has some overlap and opens the valves between 1.5 and 2 mm wider. Tim Tak.
So for use in the 940 with aw71 auto it seems an ideal cam as i won't be reving much past 6k rpm anyway.
Well thats the engine work going on but also i've been getting stuck into some of the other stuff. Mostly prepping and painting odds and sods.
Thought if i had the engine all apart the i may as well at least make things look abit better.


They only do the wrinkle paint in black and red so don't presume by seeing the pic above that the rocker cover is staying black, i have painted over the black but you'll have to wait to see that......
The engine block, inlet manifold, compressor housing, exhaust manifold and turbine housing are also in various levels of prep and paint.
Well thats all for today.......cheers for having a browse.
-
Friday 14th March 2014, 18:55 #92Senior Member
no experience but has
enthusiasm aplenty
- Join Date
- Aug 2013
- Location
- norwich
- Posts
- 261
- Thanks
- 239
Thanked 120 Times in 91 PostsNote to self:
If fitting new cam check shim gaps without new hushers fitted. Its soooo much easier.
Just take cam out and install them when you're all sorted with shims.
yeah I learnt the hard way.Last edited by artfulflounder; Friday 14th March 2014 at 19:19.
-
Friday 14th March 2014, 19:56 #93Member
This user has no status
- Join Date
- Dec 2011
- Posts
- 98
- Thanks
- 38
Thanked 17 Times in 16 PostsYou only had to ask! The hushers that are available now last a lot longer than the originals. Did you buy an Elring kit? Without them it can sound like knocking to the sensor and retardt he timing. Looking good btw.
-
Friday 14th March 2014, 20:37 #94Senior Member
no experience but has
enthusiasm aplenty
- Join Date
- Aug 2013
- Location
- norwich
- Posts
- 261
- Thanks
- 239
Thanked 120 Times in 91 Posts^^^ well i forgot to ask.lol
With the hushers it made measuring feel wierd.
so I took cam back out removed hushers refitted cam. Measured gaps took cam back out and fitted hushers back.
Job done.
Yeah it was an elring head set, got some bits in there that I've still to figure out yet.
Still got to fit thermostat and waterpump too.
-
Thursday 20th March 2014, 12:39 #95Senior Member
no experience but has
enthusiasm aplenty
- Join Date
- Aug 2013
- Location
- norwich
- Posts
- 261
- Thanks
- 239
Thanked 120 Times in 91 PostsWith most the hard work done been working hard cleaning the surface of block up and even treated to a new coat of paint so i do actually have a redblock now...

Also prepping masking painting all sorts of bits ready for fitment.

I just thought that for what its worth i would just give the old girl a bit of a face lift. Nothing too extreme.
Anyway did my home work and found out all correct torques and order for tightening everything, and fitted the head back, along with intake manifold and throttle body. New thermostat and waterpump too.
All seemed to go surprisingly well.
still got to fit throttle cable, injector rail and most the electrics on that side so bound to be some hard to find bits yet.


Got a pile of parts for the exhaust side hanging in the shed having been treated to some paint so these will go on after the intake side is done.
Yeah doesn't seem so daunting now.....i did panic a while ago and thought i'd tried to do too much and i would never end up getting the old girl running again.
Hopefully now that won't be the case.
-
The Following 3 Users Say Thank You to artfulflounder For This Useful Post:
960kg (Thursday 20th March 2014),jamesy12345 (Thursday 20th March 2014),T5frankie (Saturday 26th April 2014)
-
Thursday 20th March 2014, 12:54 #96Senior Member
228k and still not broke it!
- Join Date
- Jul 2011
- Location
- Poole, Dorset
- Posts
- 23,213
- Thanks
- 6,548
Thanked 7,752 Times in 5,648 PostsLooking sweet mate
19t, greens, 3" inlet, 3" downpipe with race cat, V70R catback, autotech map...
310.2bhp / 333ft/lb
2016 Swedish Day UK "Best Modified Swede"
SOLD
Got an old discovery now.
-
The Following User Says Thank You to M-R-P For This Useful Post:
artfulflounder (Thursday 20th March 2014)
-
Thursday 20th March 2014, 15:01 #97Senior Member
This user has no status
- Join Date
- Mar 2014
- Location
- Wellingborough
- Posts
- 216
- Thanks
- 71
Thanked 51 Times in 40 PostsCracking write up and cars looking great under the engine bay , would live to have your mechanical knowledge to be able to attemp something like that myself ,
My mobile office ,
-
The Following User Says Thank You to gwrt5 For This Useful Post:
artfulflounder (Thursday 20th March 2014)
-
Sunday 23rd March 2014, 14:32 #98Senior Member
no experience but has
enthusiasm aplenty
- Join Date
- Aug 2013
- Location
- norwich
- Posts
- 261
- Thanks
- 239
Thanked 120 Times in 91 PostsThe re-assembly continues.
I've tarted up the fuel rail and other brackets like the throttle pulley and kick down bracket.
Only got iac and egr pipe work to put back plus vacuum hoses and think thats pretty much done on the intake side.


The exhaust manifold has been painted along with the turbine housing, which also had 2 studs removed from 850 fitment and drilled out for 940 studs.
Split the compressor from centre housing so just need to finish prepping for paint then i can re-assemble for rwd.
Install new radiator and intercooler, new piping for filter and make a heat shield. Change fluids and that should be pretty much it.
Once i know i'm all up and running it'll be a 3" exhaust and a session with tunerpro.
-
Saturday 26th April 2014, 07:32 #99Senior Member
no experience but has
enthusiasm aplenty
- Join Date
- Aug 2013
- Location
- norwich
- Posts
- 261
- Thanks
- 239
Thanked 120 Times in 91 PostsBeen a while but I'm still here.....been moving house so had to put halt on the old girl for a few weeks.
Back in action again now though. Cheers to the guys that I pm'd for a bit of advice.
I now have cam belt fitted along with new cam belt covers but I have modified them.
Manifold refitted with new studs and flange nuts. Volvo now deem the 940 old so dont stock parts at the dealers, I had to wait 3-10days for parts
The manifold support bracket was a bugger so I just cut a slot in the bracket so the manifold could slide easily into it.
Looks a bit like tarts handbag as I've cleaned the spark plug heat shields and painted coil.
Just got to make bracket for actuator then the turbo can go back on, finally make an airbox come heat shield for the cone filter.
Got some pics but not had time to go on the pc yet. Hopefully shouldnt be too long now
-
Saturday 26th April 2014, 20:09 #100Member
This user has no status
- Join Date
- Dec 2011
- Posts
- 98
- Thanks
- 38
Thanked 17 Times in 16 PostsLooking excellent, I would do the valve cover red then you can see if the seal on the stopper if peeeing oil out, had mine shot blasted so it's silver and saw the oil seeping out, which you can't see if it's black. Should go well when everything is together!
-
The Following User Says Thank You to barkster1971 For This Useful Post:
artfulflounder (Saturday 26th April 2014)


 Reply With Quote
 "THE BIG SWEED"
 2005 Volvo S60r
 2005 Volvo V70R


Thread Information
Users Browsing this Thread
There are currently 1 users browsing this thread. (0 members and 1 guests)
 Posting Permissions

Bookmarks