


I thought I would post a thread on how to change the ABS Module on the Phase 2 V70 as I've taken mine off for a repair and once you have the module off, it's basically a reverse process to put everything back on. It's a good chance for me to put something back in to the forum as I don't aways get the chance. I'm also going to mention some of the things that crop up when doing this job as well as a useful tip for one stage of the job in particular, as I think it may be useful.
Now first of all for the record, I'm not a mechanic or anything close to being a mechanic yet I was able to complete this job quite easily once I'd got around one slight stumble in the middle, a stumble with a simple solution as I will mention. The actual unit is located on the nearside of the car under the engine compartment fuse box.
Tools needed:
- Torx 30 Screw Driver
- 2 x Flat Headed Screw Drivers
- 4mm E5 Torx Driver
- 10mm Socket Spanner
- Short and Long Extention Bars for your Socket Set
For those of you like me who need the extra background information, the ABS/STC 'unit' is a combination of 2 components, the main ABS/STC Control Module (the electronic side of things), and the ABS/STC Pump assembly. In this guide, I will be explaining how to remove the computer module from the pump which does not cause brake failure, leaks or anything else, it just means that your ABS and Traction Control system will not work until you replace it with a working unit. Considering that if you are changing this then your ABS/STC system is probably faulty anyway, it's not actually going to matter that much. The photo below shows the 2 components seperated from each other....
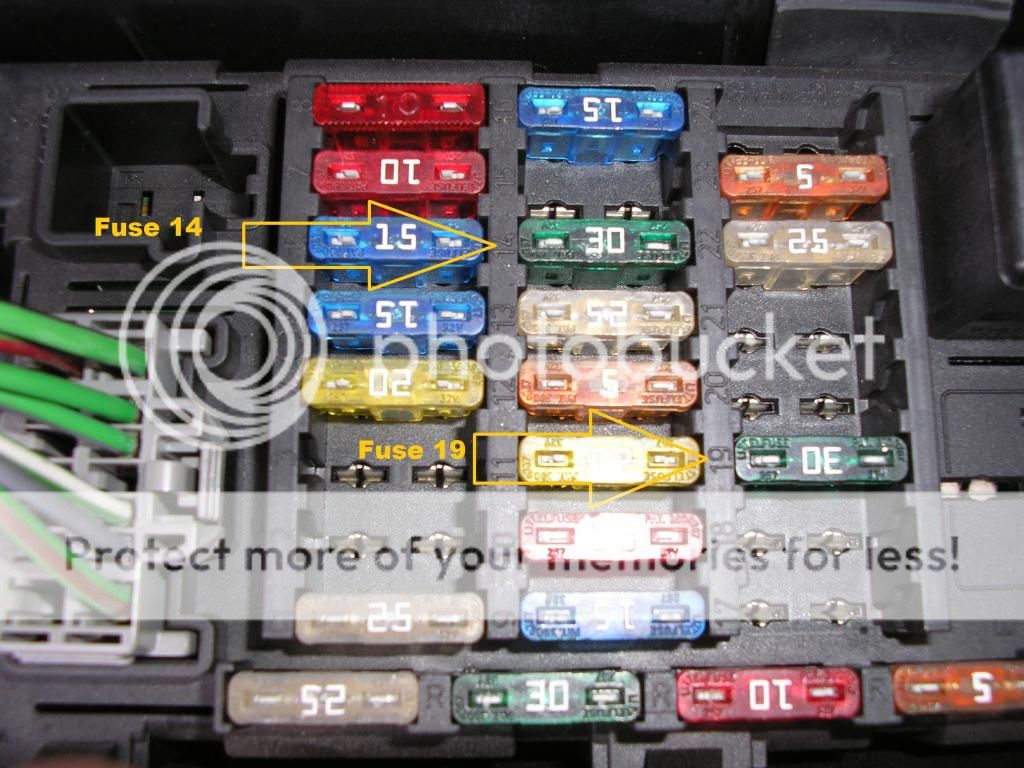
1) There is no requirement to disconnect the battery on this job but you can if you really want to. I will advise removing the 2 x 30 Amp fuses from the fuse box in the engine bay that are associated with the ABS/STC system, and do this before starting the main job keeping them in a safe place until later. The fuse numbers are '14' and '19' and are shown in the photo below.....
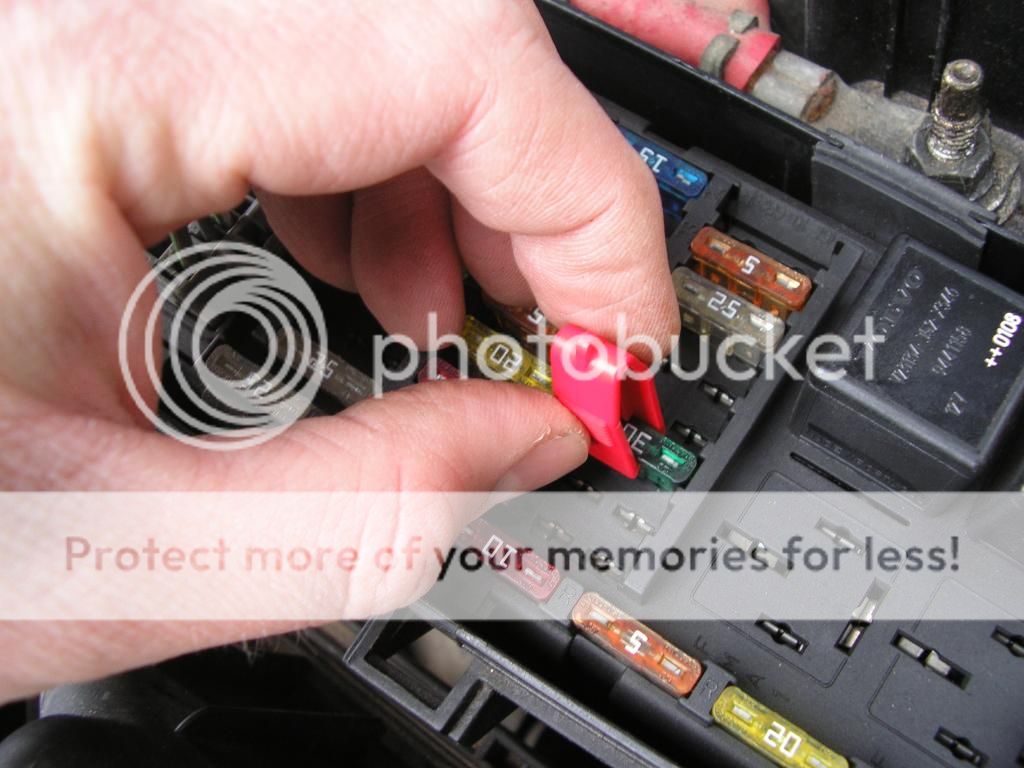
Use the fuse puller provided to remove the fuses....
2) Remove the air filter and air filter housing as follows...
a) Remove the 2 screws connecting the MAF sensor to the air filter housing (top) using the Torx 30 Screw Driver. You may need an extention bar to reach the lower one as shown in the picture....
b) Now pull the MAF Sensor away from the air filter housing (this may take a bit of a wiggle and some gentle manipulation)....
c) Unclip the air filter housing lid from the lower housing and remove the lid, then remove the air filter (the filter just lifts straight out).....
d) Unclip the grey connector from the side of the air filter housing (left hand side if looking at it whilst standing in front of the car facing the engine bay)...
e) Now remove the lower air filter housing (or base). This got me stumped to start with because it's held in by some special clips, but the technique is to get your 10mm socket spanner and push down on the 4 clips on each main clip. This squeezes them together and then at the same time, pull up gently on the air filter housing and then it will pop off. Do this for each of the 3 main clips holding the housing to the car and you're sorted.....
Technique shown more clearly with the air filter housing removed (this is just to demonstrate it to you more easily)....
Once the housing is all out you should have a scene similar to this one....
3) Look under the fuse box and you'll see the ABS/STC unit. Now remove the small electrical connector (n/a on some models) from the side of the unit as indicated by the arrow on the picture. You may need 2 flat-headed screw drivers to help you with this. Also, the picture shows the view of the unit as if looking from the front of the car in towards the engine bay now that the air filter housing has been removed....
4) Using the 4mm E5 Torx driver, unscrew the 4 (later cars, 3), screws from the top of the ABS Module. The unit is upside down so you'll feel like your working from underneath (if that makes sense). Once you have these out then the black ABS Module will come away from the pump with a bit of a wiggle. To demonstrate the screw removal more clearly, I've taken a photo of the screws coming out of another unit that was off the car.....
5) Finally, remove the large electrical connector to the main module and the module is now off, this should just pull off with a bit of a gentle tug and wiggle. Please note there may be a black plastic flap that covers the main connector, this just lifts up and down but is connected to the actual plug (as seen in the following photo)....
6) To replace the unit with a repaired or new one, simply follow the steps in reverse order, remembering to reconnect everything back up again.
Things to consider...... You will get the following error messages if you don't replace the unit (i.e. drive around whilst your unit is away for repair and don't fit a replacement in the meantime).....
- Fault Code (DTC) P1633 Vehicle Speed Signal (your speedo isn't working)
- Engine Emissions Light will light up
- The car will tell you that you have a brake failure. It hasn't, it's the car that's confused!
- ABS and Tracs Lights will continue to show
- Remember your ABS and STC system will continue not to work
- Don't take your car for the MOT with it like this - it WILL fail!
Other than that, a pretty simple job. Any questions, please ask!
Regards
James
Results 1 to 15 of 15
-
Sunday 10th March 2013, 17:32 #1Banned
 Power of a Sports Car, Turning
Circle of a Bus.
- Join Date
- May 2012
- Location
- Mid Wales
- Posts
- 4,813
- Thanks
- 1,529
Thanked 806 Times in 636 Posts How To Change ABS Module (V70 Phase 2)
Last edited by JamesT5; Sunday 10th March 2013 at 20:06. Reason: Spelling 'mistooks'
-
The Following 4 Users Say Thank You to JamesT5 For This Useful Post:
jdavis (Sunday 10th March 2013),M-R-P (Sunday 10th March 2013),stephenevans99 (Saturday 16th March 2013),Wobbly Dave (Sunday 10th March 2013)
-
Sunday 10th March 2013, 21:41 #2Senior Member
trying hard to look busy!
- Join Date
- Dec 2008
- Location
- Doncaster, South Yorkshire
- Posts
- 2,491
- Thanks
- 1,050
Thanked 579 Times in 486 PostsGood quality guide!
It's a 5 Cylinder Orchestra!
R.I.P. Kyebosh (Alan) you're memory lives on!
-
The Following User Says Thank You to jdavis For This Useful Post:
JamesT5 (Monday 11th March 2013)
-
Sunday 10th March 2013, 22:04 #3Senior Member
228k and still not broke it!
- Join Date
- Jul 2011
- Location
- Poole, Dorset
- Posts
- 23,213
- Thanks
- 6,548
Thanked 7,752 Times in 5,648 PostsVery good guide James. Well done
 19t, greens, 3" inlet, 3" downpipe with race cat, V70R catback, autotech map...
310.2bhp / 333ft/lb
2016 Swedish Day UK "Best Modified Swede"
SOLD
Got an old discovery now.
-
The Following User Says Thank You to M-R-P For This Useful Post:
JamesT5 (Monday 11th March 2013)
-
Monday 11th March 2013, 05:25 #4Driving Miss Daisy
This user has no status
- Join Date
- Feb 2012
- Location
- West London
- Posts
- 10,942
- Thanks
- 2,909
Thanked 4,171 Times in 2,943 PostsExcellent write up James, well done.
The Relentless Pursuit Of Perfection
-
The Following User Says Thank You to V70 Graham For This Useful Post:
JamesT5 (Monday 11th March 2013)
-
Monday 11th March 2013, 21:23 #5Banned
Power of a Sports Car, Turning
Circle of a Bus.
- Join Date
- May 2012
- Location
- Mid Wales
- Posts
- 4,813
- Thanks
- 1,529
Thanked 806 Times in 636 PostsThanks to all, it's not often I get the chance to do one to be honest because I'm not very practical when it comes to fixing cars (I'm much better on the theory side). Anyway, I'm hoping someone will find the 'guide' useful at some point and I think I've mopped up most of the typos and accidental spelling errors, sorry there's always the odd one that slips through the net (like 'aways' should be 'always' and I can't edit it now!)

Last edited by JamesT5; Monday 11th March 2013 at 21:25.
-
Saturday 16th March 2013, 19:04 #6Swollen Member
This user has no status
- Join Date
- May 2006
- Posts
- 4,759
- Thanks
- 1,487
Thanked 2,408 Times in 1,497 PostsGreat 'How To' guide.
I'm certain us P2 people will find it extremely useful at some point - Well Done James

-
The Following User Says Thank You to stephenevans99 For This Useful Post:
JamesT5 (Saturday 16th March 2013)
-
Tuesday 22nd August 2017, 10:02 #7Junior Member
This user has no status
- Join Date
- Aug 2017
- Posts
- 3
- Thanks
- 0
Thanked 0 Times in 0 PostsHi, new to this site and hi-jacking an old thread.
Does the unit need re-programming when fitting a second hand module? I need to replace mine and have been told it's not just a straightforward plug and play.
Thanks
Shaun
-
Tuesday 22nd August 2017, 21:12 #8Senior Member
228k and still not broke it!
- Join Date
- Jul 2011
- Location
- Poole, Dorset
- Posts
- 23,213
- Thanks
- 6,548
Thanked 7,752 Times in 5,648 PostsAs long as the part numbers and year match, you "should" be good to go.
19t, greens, 3" inlet, 3" downpipe with race cat, V70R catback, autotech map...
310.2bhp / 333ft/lb
2016 Swedish Day UK "Best Modified Swede"
SOLD
Got an old discovery now.
-
Tuesday 22nd August 2017, 23:58 #9Senior Member
...here we go again...
- Join Date
- Oct 2004
- Location
- Kent
- Posts
- 5,337
- Thanks
- 1,075
Thanked 1,393 Times in 1,068 PostsI'd also recommend that you disconnect the battery, dispite what James said. No requirement to remove any fuses, leave them as they are. Originally Posted by skelkelly
 2014 V60 Polestar 6spd Auto :: Polestar map peak boost 17.4psi :: IPD 3" DP + 150cel :: Polestar 2.5" exhaust :: Paddle Shift Geartronic :: Black glass :: Maxton Splitter :: K+N Filter :: IPD Aluminium Top engine mount :: Brembo 6 pots :: 20" Polestar rims :: Brembo 371mm floating discs :: Sensus RTi + DAB + BT + WIFi :: D3S XENARC 6000k Active bending headlights
-
Wednesday 23rd August 2017, 10:17 #10Senior Member
This user has no status
- Join Date
- May 2013
- Location
- Edinburgh
- Posts
- 742
- Thanks
- 15
Thanked 276 Times in 187 PostsIf we're advising disconnecting the battery then also probably worth mentioning the procedure to reconnect it at the end. Is it position II you need to turn the key to (I can never remember off the top of my head) and leave it there before you reconnect the battery, to prevent airbag deployment?
(standard procedure for any jobs requiring battery disconnection, not just this ABS job)2001 V70 T5 (Manual) - The Turnip
1999 9-5 Aero (Manual) - Sven
-
Wednesday 23rd August 2017, 12:56 #11Senior Member
...here we go again...
- Join Date
- Oct 2004
- Location
- Kent
- Posts
- 5,337
- Thanks
- 1,075
Thanked 1,393 Times in 1,068 PostsYes. Originally Posted by Gold 'N' Brown
2014 V60 Polestar 6spd Auto :: Polestar map peak boost 17.4psi :: IPD 3" DP + 150cel :: Polestar 2.5" exhaust :: Paddle Shift Geartronic :: Black glass :: Maxton Splitter :: K+N Filter :: IPD Aluminium Top engine mount :: Brembo 6 pots :: 20" Polestar rims :: Brembo 371mm floating discs :: Sensus RTi + DAB + BT + WIFi :: D3S XENARC 6000k Active bending headlights
-
Thursday 24th August 2017, 15:34 #12Junior Member
This user has no status
- Join Date
- Aug 2017
- Posts
- 3
- Thanks
- 0
Thanked 0 Times in 0 PostsThanks for the replies, part number is the same, model and year are the same so hopefully it will be good to go.
Fingers crossed.
-
Friday 25th August 2017, 07:05 #13Senior Member
228k and still not broke it!
- Join Date
- Jul 2011
- Location
- Poole, Dorset
- Posts
- 23,213
- Thanks
- 6,548
Thanked 7,752 Times in 5,648 PostsGood luck
19t, greens, 3" inlet, 3" downpipe with race cat, V70R catback, autotech map...
310.2bhp / 333ft/lb
2016 Swedish Day UK "Best Modified Swede"
SOLD
Got an old discovery now.
-
Wednesday 1st November 2017, 13:26 #14Junior Member
This user has no status
- Join Date
- Oct 2017
- Posts
- 1
- Thanks
- 0
Thanked 0 Times in 0 PostsAwesome guide James. Very detailed which I like. Helps out the less knowledgable dudes like myself.
-
Wednesday 1st November 2017, 18:30 #15Senior Member
...here we go again...
- Join Date
- Oct 2004
- Location
- Kent
- Posts
- 5,337
- Thanks
- 1,075
Thanked 1,393 Times in 1,068 PostsFalling on deaf ears I’m afraid. He’s banned from the forum and has been for over a year. Thank god! Originally Posted by RosarioGol
2014 V60 Polestar 6spd Auto :: Polestar map peak boost 17.4psi :: IPD 3" DP + 150cel :: Polestar 2.5" exhaust :: Paddle Shift Geartronic :: Black glass :: Maxton Splitter :: K+N Filter :: IPD Aluminium Top engine mount :: Brembo 6 pots :: 20" Polestar rims :: Brembo 371mm floating discs :: Sensus RTi + DAB + BT + WIFi :: D3S XENARC 6000k Active bending headlights


 Reply With Quote
 "THE BIG SWEED"
 1995 Volvo 850 T5R
 1998 Volvo V70 T5 SE

 2004 Volvo S60 D5 SE
 The DaRk Knight

Thread Information
Users Browsing this Thread
There are currently 1 users browsing this thread. (0 members and 1 guests)
 Posting Permissions

Bookmarks