


When I was looking around at Phase 2 V70s, all the door handles seem to have the paint flaked away as in the photo below. Anybody repainted or done anything to them to make them look a bit better?

Results 1 to 12 of 12
Thread: Door handles
-
Wednesday 21st September 2005, 08:25 #1Senior Member
 This user has no status
- Join Date
- Aug 2005
- Location
- Blandford, Dorset
- Posts
- 188
- Thanks
- 0
Thanked 0 Times in 0 Posts
Door handles
Wayne

-
Monday 26th September 2005, 13:53 #2Trader
This user has no status
- Join Date
- Mar 2005
- Location
- Abertawe, Cymru (Swansea, Wales)
- Posts
- 2,014
- Thanks
- 227
Thanked 291 Times in 213 Postsquite a common thing on these, we used to change loads of them.
dont think there is a remedy to stop it happening, (bad design really) as far as i know you need to change them for new. If VOLVO is Your Drug, I am Your Dealer!
FRF FEEDBACK (click here)

Click Here for Info on FRF Motors...
<FOR QUOTES PLEASE CALL 01792 790066 / 01792 784272>
(Mon to Fri 9am to 5pm)
PLEASE QUOTE DISCOUNT CODE: "C3" FOR OUR BEST DISCOUNTED PRICES!

-
Monday 26th September 2005, 14:09 #3Senior Member
This user has no status
- Join Date
- May 2005
- Posts
- 3,244
- Thanks
- 58
Thanked 269 Times in 187 PostsLooks like the titantium is painted over the wood veneer.....try taking the titanium colour off and leave it as a complete wood look...the silver handle against that might look nice? Originally Posted by Rufe
-
Monday 26th September 2005, 15:23 #4Senior Member
This user has no status
- Join Date
- Nov 2004
- Location
- Ilford,Essex.
- Posts
- 6,154
- Thanks
- 747
Thanked 403 Times in 349 Posts
Looks to me like the paint wasn't meant to be sprayed on plastic, you need a plastic primer to be able to paint those.
So they have just be plain sprayed over V40 2.0T Sport Lux Titanium grey,(03) 133k,standard
Yamaha R1 5VY,(06) 180bhp/165whp,100nm
-
Monday 26th September 2005, 16:04 #5Senior Member
This user has no status
- Join Date
- Jun 2005
- Location
- Grimsby, UK
- Posts
- 217
- Thanks
- 0
Thanked 0 Times in 0 Posts
Cut your fingernails
 1998 S70 T5 - RICA 310 - ITG Filter - 17" Titans - Black Grill - Powerflow Catback - 302mm Discs - EBC pads - A nice bit of torque steer.
FOR SALE! PM ME
-
Tuesday 27th September 2005, 12:40 #6Senior Member
This user has no status
- Join Date
- Mar 2005
- Location
- Derby
- Posts
- 533
- Thanks
- 0
Thanked 0 Times in 0 PostsMine is exaclty the same, as is every other Phase 2 I've seen. Design fault definately.
Let me know if you do paint it.....Ex-V70 T5 P2 Owner, and loved it!
Audi A4 2.0T - 220 BHP, Daytime
Skyline R33 GTR - 400 BHP, Playtime!!
-
Tuesday 27th September 2005, 21:53 #7Junior Member
This user has no status
- Join Date
- Dec 2004
- Posts
- 3
- Thanks
- 0
Thanked 0 Times in 0 PostsCarefully remove all the grey - it looks fine - don't know quite why they bothered in the first place
-
Tuesday 27th September 2005, 22:10 #8Senior Member
No replacement for
displacement!
- Join Date
- Mar 2005
- Location
- Bristol
- Posts
- 1,537
- Thanks
- 35
Thanked 269 Times in 206 Posts
You'll have to download a new set of paint drivers off VIDA.
That will be £100 for the one hours labour plus the download cost.
Don't think about going to a scrappie and getting some off another car as they will be rejected because the car will not recognise the DNA of the new handles and will reject them.
Get some Humbrol model paint and a small paint brush....
-
Thursday 29th September 2005, 20:32 #9Trader
This user has no status
- Join Date
- Mar 2005
- Location
- Abertawe, Cymru (Swansea, Wales)
- Posts
- 2,014
- Thanks
- 227
Thanked 291 Times in 213 PostsLMAO Originally Posted by Redbrick
 sounds about right!
btw, i have found a fix, it requires a slight adjustment of the handle... it looks simple, yet a bit tricky if you get me, will post more later
If VOLVO is Your Drug, I am Your Dealer!
FRF FEEDBACK (click here)
Click Here for Info on FRF Motors...
<FOR QUOTES PLEASE CALL 01792 790066 / 01792 784272>
(Mon to Fri 9am to 5pm)
PLEASE QUOTE DISCOUNT CODE: "C3" FOR OUR BEST DISCOUNTED PRICES!
-
Thursday 29th September 2005, 21:12 #10Trader
This user has no status
- Join Date
- Mar 2005
- Location
- Abertawe, Cymru (Swansea, Wales)
- Posts
- 2,014
- Thanks
- 227
Thanked 291 Times in 213 PostsDESCRIPTION:
There have been cases reported where the door panel moulding in imitation walnut wood has cracked due to conflict with the door opener handle.
The critical point is the radius at the rear lower corner of the handle, where the clearnece between the handle and moulding may be too small or non-existent, causing paint finish to rub away.
PRODUCT MODIFICATION:
Inner door handle and moulding moved to nominal positions. for vehicles which fall into the chassis range below:
VEHICLES AFFTECTED:
S60, 2001 - 2002, Plant 22, chassis range = 000172 to 188073.
XC70, 2001 - 2002, Plant 21, chassis range = 000160 to 080374.
New V70, 2000 - 2002, Plant 22, chassis range = 031869 to 254499.
New V70, 2000 - 2002, Plant 21, chassis range = 000259 to 255968.
SERVICE:
Untill now the only service solution has been to replace complete panel. Now, not only replace the panel, but REPOSTION the new moulding in conjunction with fitting the new panel, as shown below.
ADJUSTMENT:
1. DISASSEMBLING.
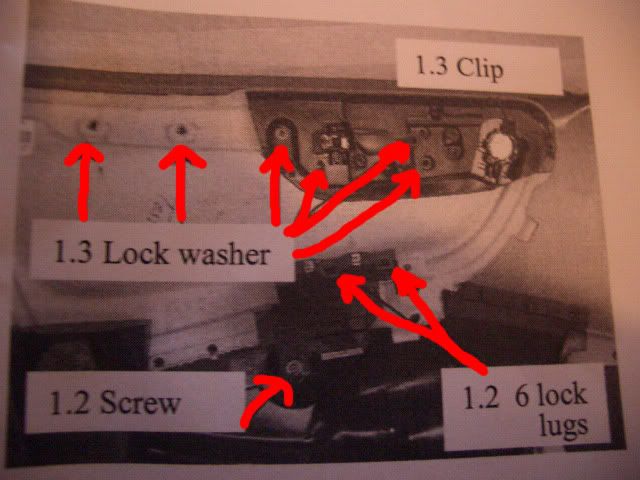
1.1 REMOVE doorpanel. (see PIC 1)
1.2 REMOVE switchpack (see PIC 1)
- 1 x screw, 6 x lock lugs.
1.3 REMOVE doorhandle moulding (see PIC 1)
- 1 x clip (use a flat plier and pull out securing clip)
- 6 x lock washers (PN 968766 x 6, replace for new)
PIC 1:
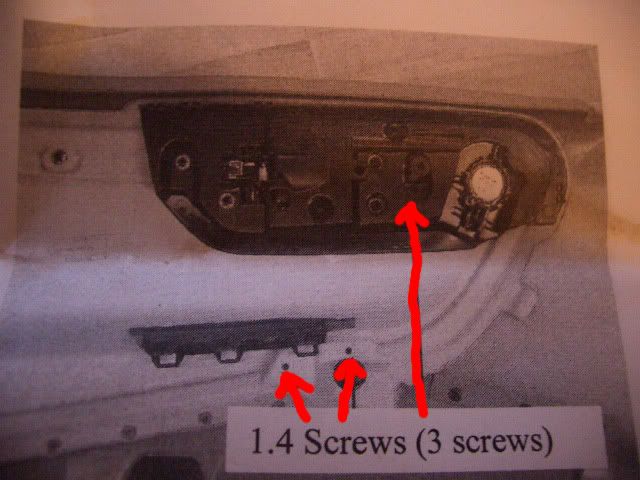
1.4 REMOVE the handle (see PIC 2)
- 3 x screws
PIC 2:
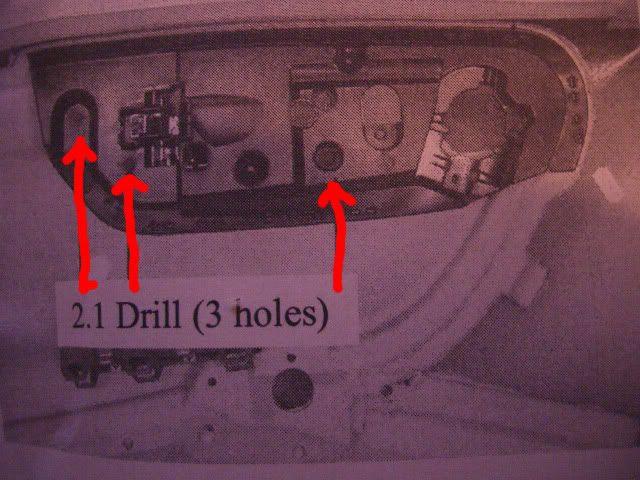
2. ADJUSTMENT.
2.1 Use a 10mm diameter drill. Drill through the 3 holes completely. (See PIC 3)
PIC 3.
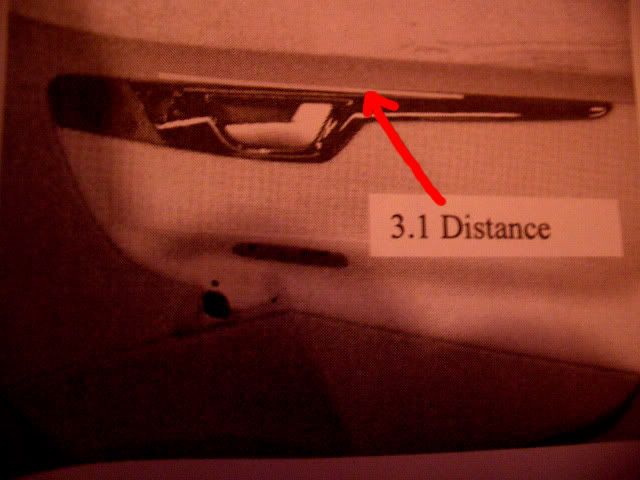
3. ASSEMBLY.
3.1 Place the moulding in its position with a 1.5mm distance between the top edge of the moulding, and door panel frame. This will lower the moulding position slightly. HINT - a plastic ruler can be used as a distance. Be carefull with the anti-squeak tape on the moulding. (see PIC 4)
PIC 4.
3.2 Use a washer PN 960142 (10x26x2) and place as shown in PIC 5.
PIC 5.

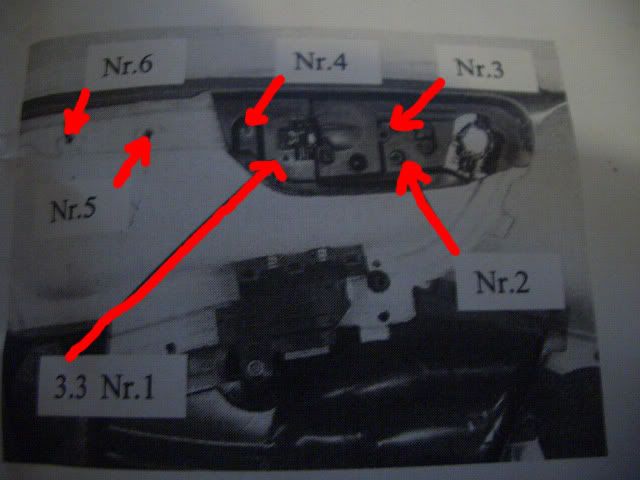
3.3 Assemble lock washers in numerical order as shown in PIC 6.
PIC 6.
3.4 Remove Distance.
3.5 Assemble handle.
3.6 Assemble switch pack.
3.7 Assemble door panel.
3.8 Check that no conflict appears.
Hopefully this may be of use to someone, i dont know, took me long enough to type out though. sorry about picture quality too, not the best i know, but may give enough idea
If VOLVO is Your Drug, I am Your Dealer!
FRF FEEDBACK (click here)
Click Here for Info on FRF Motors...
<FOR QUOTES PLEASE CALL 01792 790066 / 01792 784272>
(Mon to Fri 9am to 5pm)
PLEASE QUOTE DISCOUNT CODE: "C3" FOR OUR BEST DISCOUNTED PRICES!
-
Monday 24th October 2005, 13:03 #11Senior Member
This user has no status
- Join Date
- Aug 2005
- Location
- Blandford, Dorset
- Posts
- 188
- Thanks
- 0
Thanked 0 Times in 0 Posts
Thx mate, only just noticed this. Very imformative.
Wayne
-
Monday 24th October 2005, 13:17 #12Senior Member
This user has no status
- Join Date
- Oct 2004
- Location
- OFFLINE
- Posts
- 925
- Thanks
- 0
Thanked 1 Time in 1 Post
Top post Rufe!
Impressive - just wish now I had a 70 so I could tit about with the door handles a bit!

Fun in the twisties!
We take the "be polite" rule very seriously!

 Reply With Quote


 Saffy
Saffy


Thread Information
Users Browsing this Thread
There are currently 1 users browsing this thread. (0 members and 1 guests)
 Posting Permissions

Bookmarks