


 Red Devil
 The Beast! R.I.P No longer here.
 VOLVO 850 T5
Folks need some advice here. Im affraid my technical knowledge is lacking and my ability to undo nuts everymore improving.
Basically I am removing the head off a donor T5 engine to get skimmed and refurbed and placed onto my engine as the valve stem seals are shot.
I have removed the cambelt etc and began to remove the cam sprockets however after removing the last nut on both sides the drill bit I used to keep the cams in place didnt work and both have moved considerably from their original loaction.
My question is what impact will this have? Is it mainly important for the bottom end or am I likely to have ruined the top end too?
If they need to be in the correct place can they be re timed up with relative ease as this if applicable will obviously need doing prior to fitting to my engine.
Cheers
Results 1 to 17 of 17
Thread: 850 Head Removal and Replacement
-
Wednesday 6th July 2011, 22:22 #1"The Instigator"
 This user has no status
- Join Date
- Sep 2008
- Location
- Norwich, Norfolk
- Posts
- 6,482
- Thanks
- 2,842
Thanked 2,912 Times in 1,859 Posts850 Head Removal and Replacement
Arguing is pointless....she may not be right but she's never wrong
Tell her a remap is just having your satnav updated.....
-
Wednesday 6th July 2011, 22:32 #2Trader
No Longer a trader.
- Join Date
- Aug 2004
- Location
- Sunning it up in Chorley
- Posts
- 12,660
- Thanks
- 2,980
Thanked 2,222 Times in 1,791 PostsThey'll be fine mate, that's just the cam timing, provided they're lined up again before you stick the cam belt on you shouldn't have any problems.
http://www.airbrushartists.org/Gal72..._s_Gallery.asp
Currently rocking Volvo's finest V70R 2WD Manual
Previous cars:
1996 855 T5 (Ex Police),1996 854 T5,1996 855 T5,1995 855 Black T-5R,1996 960,1997 855 R
-
The Following User Says Thank You to Tomcat For This Useful Post:
The Flying Moose (Wednesday 6th July 2011)
-
Wednesday 6th July 2011, 22:50 #3"The Instigator"
This user has no status
- Join Date
- Sep 2008
- Location
- Norwich, Norfolk
- Posts
- 6,482
- Thanks
- 2,842
Thanked 2,912 Times in 1,859 PostsCheers TC. Obviously the sprockets are removed at the moment too. How do I go about re-aligning it all before fitting it onto my car then? Can it be done easily as im assuming there are no marks on the cams themselves as to where they should be seated and to which orientation. Originally Posted by Tomcat
 Arguing is pointless....she may not be right but she's never wrong
Tell her a remap is just having your satnav updated.....
-
Wednesday 6th July 2011, 22:51 #4Senior Member
VPCUK Car of the Year 2013
Jim
- Join Date
- Feb 2009
- Location
- Kangaroo land
- Posts
- 11,131
- Thanks
- 7,069
Thanked 5,282 Times in 3,549 PostsTippex is a man's best friend

T35, 556Nm/410lbft & 361BHP/317WHP
-
Wednesday 6th July 2011, 23:05 #5"The Instigator"
This user has no status
- Join Date
- Sep 2008
- Location
- Norwich, Norfolk
- Posts
- 6,482
- Thanks
- 2,842
Thanked 2,912 Times in 1,859 PostsOnly problem is james they have moved after the cam sprockets were taken off. How do I know where they should have been in the first place? Originally Posted by jamest5r
Arguing is pointless....she may not be right but she's never wrong
Tell her a remap is just having your satnav updated.....
-
Wednesday 6th July 2011, 23:19 #6Senior Member
"Just cos the got the
power, don't mean you got the
right"
- Join Date
- Oct 2009
- Location
- M1 Junc. 30
- Posts
- 276
- Thanks
- 15
Thanked 33 Times in 24 PostsYou may as well put the cam wheels back on cos you dont need them off to take the head off, like some one said, mark them up 'In' and 'ex' for when you take the cams out/off... The cam wheels will have a 'clean spot' on them where the bolt was origianally placed so just as long as they go back in the same place, you should'nt have a problem timing it back up, combined with the other timing marks on the timing cover... The only other thing i have read is that getting the cam cover down (when its being re-built) cleanly/correctly is not straight forward, i think it involves some long threaded bars (x4) with a nut on it (i think its to do with the bolts are'nt long enough because the valve springs will need compressing by the cam) to start seating it and then you can start putting our bolts back in once its down far enough, also make sure it goes down evenly...
-
The Following User Says Thank You to silverswedemachine For This Useful Post:
The Flying Moose (Wednesday 6th July 2011)
-
Wednesday 6th July 2011, 23:22 #7"The Instigator"
This user has no status
- Join Date
- Sep 2008
- Location
- Norwich, Norfolk
- Posts
- 6,482
- Thanks
- 2,842
Thanked 2,912 Times in 1,859 PostsIf thats the case ill put them back on luckily I marked them inlet and exhuast and put an arrow to top side. Only slight issue with the cover is that its damaged and unmarked so can only go by the official marking as per detailed in the haynes manual. Originally Posted by silverswedemachine
Arguing is pointless....she may not be right but she's never wrong
Tell her a remap is just having your satnav updated.....
-
Wednesday 6th July 2011, 23:28 #8Senior Member
"Just cos the got the
power, don't mean you got the
right"
- Join Date
- Oct 2009
- Location
- M1 Junc. 30
- Posts
- 276
- Thanks
- 15
Thanked 33 Times in 24 PostsNOt sure what cover you are referring to when you say its damaged, but as long as your back plate, behind the timing belt, is ok, just line the volvo timing marks on the cam wheels with the notches in the back plate, its easy job on these...
-
The Following User Says Thank You to silverswedemachine For This Useful Post:
The Flying Moose (Wednesday 6th July 2011)
-
Wednesday 6th July 2011, 23:35 #9"The Instigator"
This user has no status
- Join Date
- Sep 2008
- Location
- Norwich, Norfolk
- Posts
- 6,482
- Thanks
- 2,842
Thanked 2,912 Times in 1,859 PostsI was reffering to the plastic rear cover. However I think I know what you mean.
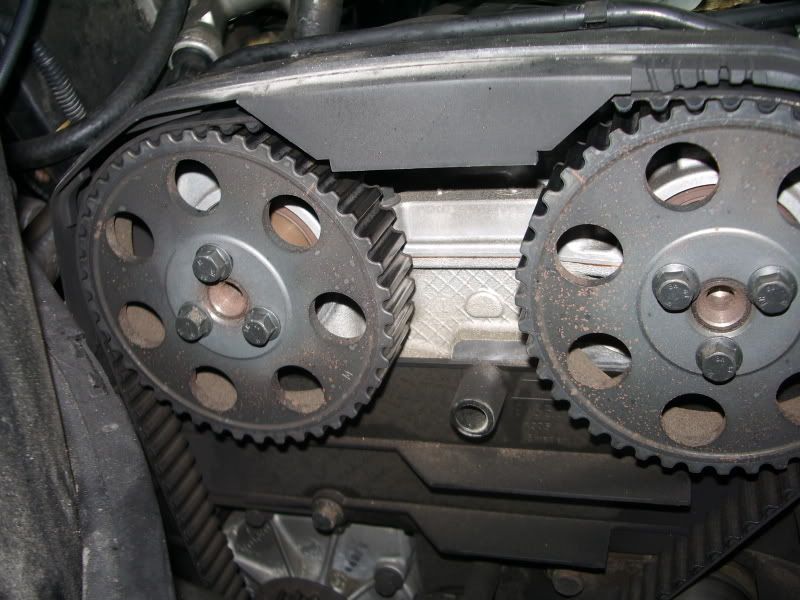
The square cut out notches in the plastic and the engraved lines in the cam sprockets as below yes?
 Arguing is pointless....she may not be right but she's never wrong
Tell her a remap is just having your satnav updated.....
-
Wednesday 6th July 2011, 23:42 #10Senior Member
"Just cos the got the
power, don't mean you got the
right"
- Join Date
- Oct 2009
- Location
- M1 Junc. 30
- Posts
- 276
- Thanks
- 15
Thanked 33 Times in 24 PostsYup, thats how it should be... Crank notch, its at the back nearer the block, is a little harder to see mind you...
-
Thursday 7th July 2011, 07:28 #11Senior Member
This user has no status
- Join Date
- Jul 2008
- Location
- Midlands
- Posts
- 1,914
- Thanks
- 46
Thanked 342 Times in 293 PostsYou need to keep the crank in position at its mark. Then lock the cams in position in the upper cover with a suitable tool at the rear, homemade will do, after applying sealer to the upper cover. Make sure your cam journals/lobes are lubricated or you will cause an interferance problem well the cams will fail to rotate and be effectively locked because of no lubrication. The cams at the rear are slotted in a certain way that they go in in a certain position. Then pull the upper cover down with some other home made tools or the proper items onto the head. I would use new genuine lifters when re assembling as the engine will need another strip down the line to replace them if not. The assembly procedure in haynes is pretty well explanatory if you just re read it a few times and keep a methodical approach compared to removal. If you get stuck just PM me and I'll pass on my number for you to call.
-
Thursday 7th July 2011, 09:07 #12Shiny Superstar
Back in the game!
- Join Date
- Aug 2004
- Location
- Stunning Shropshire
- Posts
- 17,773
- Thanks
- 2,501
Thanked 3,484 Times in 2,466 Posts
seen some cheap tools on ebay for cam locking. Proper Volvo one was 175 quid!!
Last edited by Wobbly Dave; Thursday 7th July 2011 at 09:20.
Volvo ABS ECU Repair
Join my projecteers tribe - Old Volvos Never Die - They just get faster.
Visit my VPCUK garage and my YouTube channel - WobblyDave72
-
Thursday 7th July 2011, 18:56 #13Moderator
This user has no status
- Join Date
- Feb 2010
- Location
- Norfolk
- Posts
- 1,538
- Thanks
- 257
Thanked 393 Times in 309 PostsEm..Dont panic i have the locking tools and I will fit the head and time it for you..You will need to remove the cam wheels as we will be starting with a bare head.
-
Thursday 7th July 2011, 19:33 #14Senior Member
This user has no status
- Join Date
- Apr 2011
- Location
- Grimsby
- Posts
- 1,593
- Thanks
- 483
Thanked 533 Times in 425 Postshey moose if u need a hand when doing that part i can bob down to help mate
simonP1 V70 2.5T Scorpion Exhaust, 3" downpipe 100cel cat, BSR induction, KKK24, GWE 3" Maf to turbo pipe,japanifold , 2010 V50 T5 Alloys Projector Headlamps with 5k Hid kit Quickshift kit, strut brace, Koni Yellow Sport,IPD BCS AET motorsport remap
Previous: 2004 XC90 T6, 240GLT Estate, 343DL
Toys: Capri 3.7 Twin turbo, Kawasaki ZX10R 2006,
-
Thursday 7th July 2011, 23:05 #15"The Instigator"
This user has no status
- Join Date
- Sep 2008
- Location
- Norwich, Norfolk
- Posts
- 6,482
- Thanks
- 2,842
Thanked 2,912 Times in 1,859 PostsManaged to get the head removed today, all sorted thanks chaps for the advice. A little dawning as I had never done anything on this scale before but afterwards you realise as with all things automotive its only nuts and bolts!
Arguing is pointless....she may not be right but she's never wrong
Tell her a remap is just having your satnav updated.....
-
Friday 8th July 2011, 05:50 #16Senior Member
5 pot heart of a Volvo
- Join Date
- Apr 2006
- Location
- On the strip
- Posts
- 24,505
- Thanks
- 4,423
Thanked 5,683 Times in 4,419 PostsDaunting lol

-
Friday 8th July 2011, 11:41 #17"The Instigator"
This user has no status
- Join Date
- Sep 2008
- Location
- Norwich, Norfolk
- Posts
- 6,482
- Thanks
- 2,842
Thanked 2,912 Times in 1,859 PostsBlooming picky so and so lol Originally Posted by t5frankie
Arguing is pointless....she may not be right but she's never wrong
Tell her a remap is just having your satnav updated.....
-
The Following User Says Thank You to The Flying Moose For This Useful Post:
T5frankie (Friday 8th July 2011)

 Reply With Quote
 2011 Volvo 850R
 My 960


 1996 Volvo 850 T5
 Gone to the big scrapyard in the sky...
 My first Volov and T5...

 Betsy aka Silver Shit Box (SSB)
 1995 Volvo 854 T5
 1997 Volvo 850R
 2000 Volvo v70 SE T5
 1999 Volvo V70 2.5T

 The Evil twin
Thread Information
Users Browsing this Thread
There are currently 1 users browsing this thread. (0 members and 1 guests)
 Posting Permissions

Bookmarks