


 The DaRk Knight
All AWD owners are or should be aware of the costs involved regards the infamous Propshaft. £750 will get you a new one or £250 will buy you a repair kit (for one bearing only). Having every invoice on my car i knew that the prop had been repaired once to the tune of £380. At the time of repairing my own car i had researched this matter until i was fed up with it and decided to tackle it myself. Mainly because the tinkling noise and vibration was starting to piss me off to say the least.
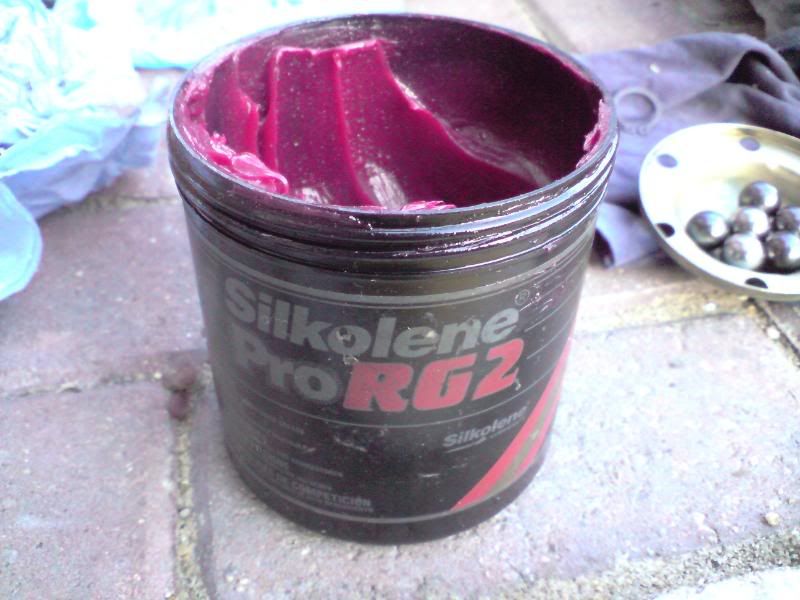
you will need a jack, two ramps, flat surface to work on, Tub of good quality grease (i used Silkolene Pro RG2 high melting point grease) £15. A few tools that will be obvious once you have a look under your car and read this 'How to'.
Here we go then....
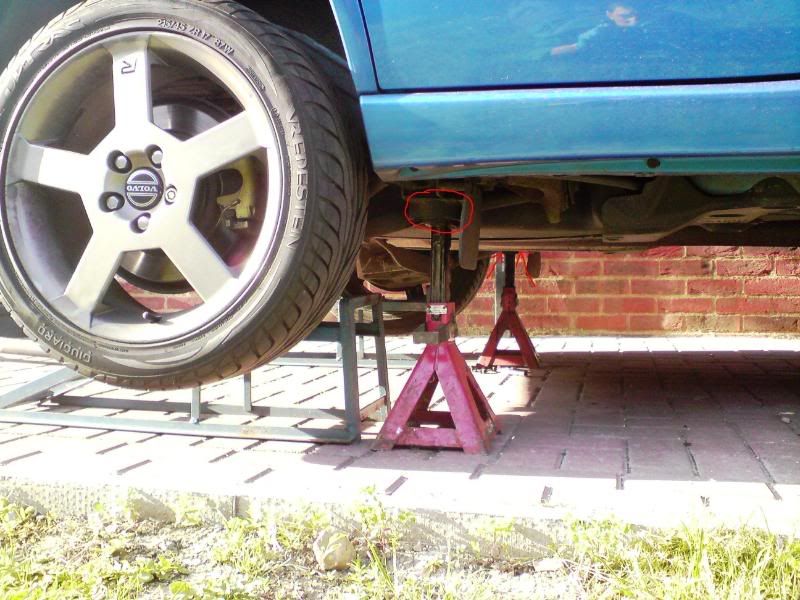
Firstly, raise your car off the deck...all of it, or you will struggle! Point to note: ALL 4 WHEELS MUST BE FREE TO ROTATE.
Be especially careful where you jack from and where you put your axle stands.
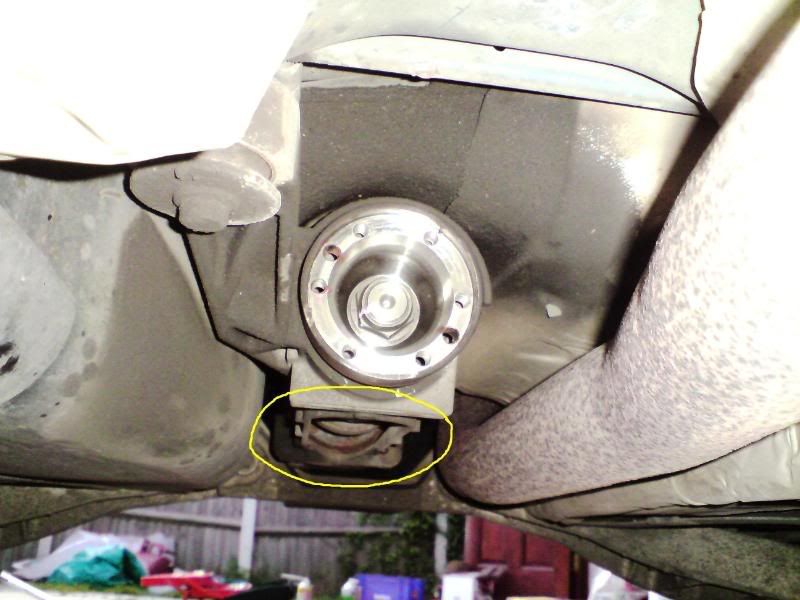
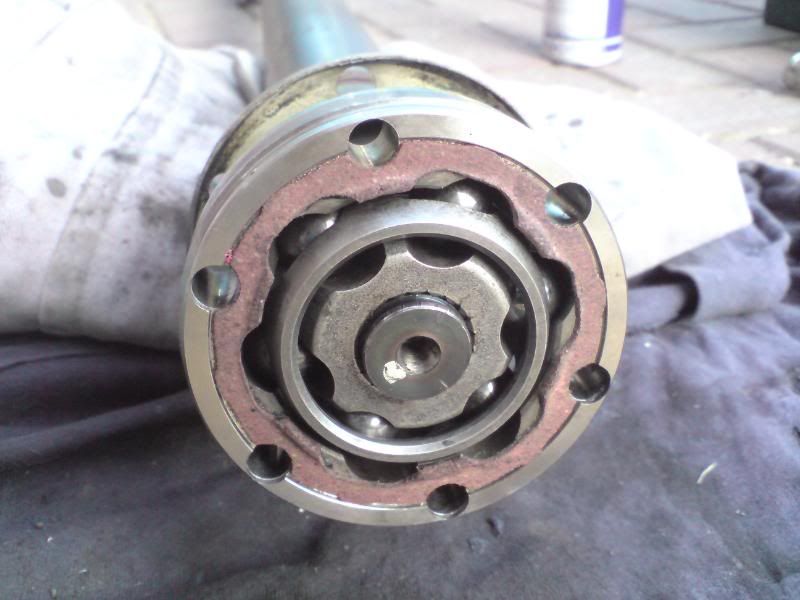
Next (using a buddy) get your buddy to rotate a wheel, ensuring hand brake is off and car is in neutral, as you lay underneath, working from front to rear and undo the CV bolts for the propshaft. Front CV, Rear CV and then center support bearing, in that order. It is vital that you do not undo the center support bearing until last as this will make removal of the CV bolts almost impossible. The prop is not heavy, i just layed it on my chest when i removed the center support bearing and then slid out from under the car with it ontop of me. Prop removed you will see this...
Front CV Transfer box output face
Rear CV with Torque tube (highlighted yellow)
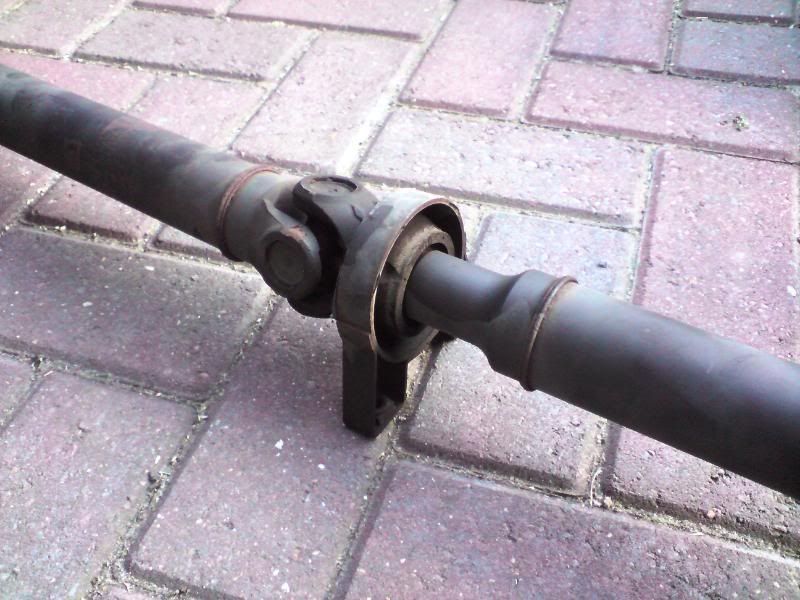
Next you need to check the condition of the support bearing seen below...
Your bearing should rotate smoothly with a knats ££££ amount of free play. Anything more and your bearing will need overhaul, which means sending the entire prop to a bearing company.
I researched these bearings and found only two company's that recognise and could replace the shaft with the correct bearing. All bearings have numbers stamped on them and it is this that the company needs to cross reference with it's own make of bearing. Off the top of my head your looking in the region of £50-80 and that is for the bearing only!
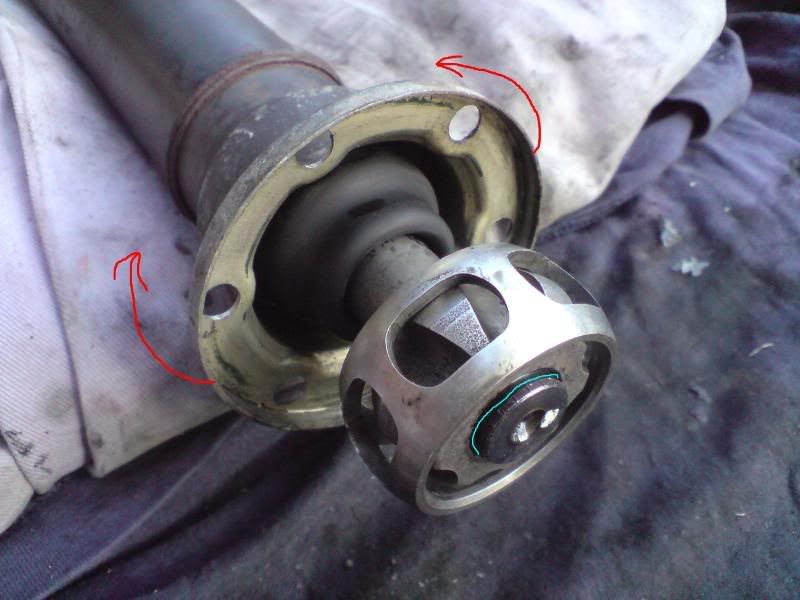
Anyway, if your bearing is ok then continue on. Using a blunt spoon (only joking!) a large flat head screwdriver, gently tap off the end cap then pull back the gaiter to completely expose the CV bearing.
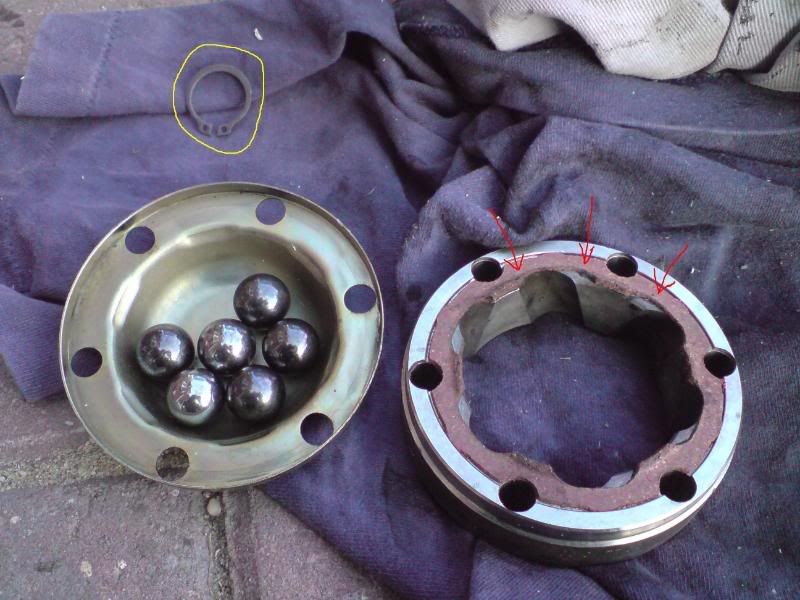
Then using carburettor cleaner, give the bearing a good degunge. Mine was bone dry so i just spayed some WD40 and then proceeded to strip down the bearing, cleaned it all up until it looked like this...
Ignore the circlip (highlighted yellow) as you don't need to remove it. Becareful not to damage the cork gasget (3 red arrows)
Proceed to do exactly the same with the rear CV as i garantee this will be in the same sorry state as the front and you may aswell kill two birds with one stone.
Tea Break
............................................Tea break over
Assembly
Assemble the bearing dry ensuring you take your time and do not force any of the balls into the cage. Be patient
Using copious amounts of this stuff vvvvv (use a good quality high melting point bearing grease)...
...pack as much grease into the end cap and gaiter as you can....Then tilting the bearing at an angle work as much grease as possible in the bearing race ensuring all metal surfaces are coated.
Then using two bolts fit the end cap and align the holes...When you fit the end cap and push it home you want grease to be spilling out of every orifice. If it doesn't, take the cap off and pack more grease into the bearing. You will never fill it 100% so don't worry.
It is vital that the bolt holes line up with the end cap or you won't be able to line up the holes on the face of the transfer box output and Torque tube input face.
Refitting to the car is the opposite of removal. Take your time, you do not want to strip a bolt at this stage!! Re torque the bolts to whatever they should be (i used FT, thread lock and my good judgement)
Clean all your tools away, drop yer car on the floor and take her for a road test.
No more tinkling, vibrating or any prop noises whatsoever.You should have time at the end of the day to go for a nice drive to a good pub and treat yourself to a beer and think of all that wonga you've just saved.
Results 1 to 19 of 19
Thread: AWD Propshaft woes, How to fix!!
-
Tuesday 21st April 2009, 17:11 #1Senior Member
 ...here we go again...
- Join Date
- Oct 2004
- Location
- Kent
- Posts
- 5,337
- Thanks
- 1,075
Thanked 1,393 Times in 1,068 Posts AWD Propshaft woes, How to fix!!
Last edited by LeeT5; Saturday 25th April 2009 at 23:06.
2014 V60 Polestar 6spd Auto :: Polestar map peak boost 17.4psi :: IPD 3" DP + 150cel :: Polestar 2.5" exhaust :: Paddle Shift Geartronic :: Black glass :: Maxton Splitter :: K+N Filter :: IPD Aluminium Top engine mount :: Brembo 6 pots :: 20" Polestar rims :: Brembo 371mm floating discs :: Sensus RTi + DAB + BT + WIFi :: D3S XENARC 6000k Active bending headlights
-
The Following 8 Users Say Thank You to LeeT5 For This Useful Post:
Aberdeen Loon (Wednesday 22nd April 2009),Dangerous Dave (Tuesday 21st April 2009),muscas (Friday 24th April 2009),Nick0 (Tuesday 10th April 2012),Niles (Wednesday 22nd April 2009),siamblue (Friday 1st October 2010),stricky1967 (Thursday 20th October 2016),tattoo101 (Tuesday 25th October 2011)
-
Tuesday 21st April 2009, 17:35 #2Senior Member
This user has no status
- Join Date
- Feb 2005
- Location
- Herts
- Posts
- 4,405
- Thanks
- 672
Thanked 887 Times in 593 PostsTalk about useful - thanks for taking the time to post this up. Good man!
Alastair
Current: 2009 Cayenne GTS and a 2016 Prius IV... yes.
Previous Volvos: 2009 V50 D5 R-Design, 2005 V70R, 2001 V70 T5, 2001 S40 T4, 2x 1999 S40 T4, 2003 V40 T4, 1999 V70 T5, 1996 854 T5 & 855 T5, 1995 855 T5, and a 480...
Previous other stuff: Saxo Turbo, 2004 996 C4S, 2008 Z4M, 2001 Yaris T-Sport, 2002 S2000 Mugen, and a 1999 Evo VI
-
Tuesday 21st April 2009, 18:20 #3Senior Member
...here we go again...
- Join Date
- Oct 2004
- Location
- Kent
- Posts
- 5,337
- Thanks
- 1,075
Thanked 1,393 Times in 1,068 PostsNo worries! I almost gave up cos i use firefox and nearly at the end i accidently closed the tab for this page Originally Posted by Al115

 ....had to start all over again. Taken me 4 hours! I hope it was worth it.
2014 V60 Polestar 6spd Auto :: Polestar map peak boost 17.4psi :: IPD 3" DP + 150cel :: Polestar 2.5" exhaust :: Paddle Shift Geartronic :: Black glass :: Maxton Splitter :: K+N Filter :: IPD Aluminium Top engine mount :: Brembo 6 pots :: 20" Polestar rims :: Brembo 371mm floating discs :: Sensus RTi + DAB + BT + WIFi :: D3S XENARC 6000k Active bending headlights
....had to start all over again. Taken me 4 hours! I hope it was worth it.
2014 V60 Polestar 6spd Auto :: Polestar map peak boost 17.4psi :: IPD 3" DP + 150cel :: Polestar 2.5" exhaust :: Paddle Shift Geartronic :: Black glass :: Maxton Splitter :: K+N Filter :: IPD Aluminium Top engine mount :: Brembo 6 pots :: 20" Polestar rims :: Brembo 371mm floating discs :: Sensus RTi + DAB + BT + WIFi :: D3S XENARC 6000k Active bending headlights
-
Tuesday 21st April 2009, 19:46 #4New Identity
Back in an AWD....Oh the grip!
- Join Date
- Dec 2006
- Location
- West Midlands
- Posts
- 8,921
- Thanks
- 2,491
Thanked 2,582 Times in 2,051 PostsNice one matey. Fantastic write up.
I did this to mine ages ago (but forgot to take pics for a how-to LOL), but now the front UJ gaitor has broken, so I'm gonna try and fit a CV boot to it somehow.
P.S. I find it easier to write a how-to in Word, then copy and paste it into here when ready.1996 Olive Green 850 AWD - Follow the Project - Forged rods, 19T, big blue injectors, 960 TB, 3.25" MAF, Ostrich, 608 binary, arduino data display, active exhaust control with Focus RS tips, 320mm front brake conversion.
1996 Nautic Blue 850 AWD - Failed its MOT, now it's a donor for the green thing.
2004 Sapphire Black S60 D5 - The new daily hack.
-
Tuesday 21st April 2009, 23:44 #5Senior Member
...here we go again...
- Join Date
- Oct 2004
- Location
- Kent
- Posts
- 5,337
- Thanks
- 1,075
Thanked 1,393 Times in 1,068 PostsFitting the gaiter will be easy. You will just need to remove the circlip (circled in yellow) then remove the bearing race. Cut away your old gaiter and slide on the new one. Let us know in this thread if you can get the gaiter on its own from dealer.
2014 V60 Polestar 6spd Auto :: Polestar map peak boost 17.4psi :: IPD 3" DP + 150cel :: Polestar 2.5" exhaust :: Paddle Shift Geartronic :: Black glass :: Maxton Splitter :: K+N Filter :: IPD Aluminium Top engine mount :: Brembo 6 pots :: 20" Polestar rims :: Brembo 371mm floating discs :: Sensus RTi + DAB + BT + WIFi :: D3S XENARC 6000k Active bending headlights
-
Tuesday 21st April 2009, 23:45 #6Trader
No Longer a trader.
- Join Date
- Aug 2004
- Location
- Sunning it up in Chorley
- Posts
- 12,660
- Thanks
- 2,980
Thanked 2,222 Times in 1,791 PostsNice thread Lee, thanks for taking the trouble.
http://www.airbrushartists.org/Gal72..._s_Gallery.asp
Currently rocking Volvo's finest V70R 2WD Manual
Previous cars:
1996 855 T5 (Ex Police),1996 854 T5,1996 855 T5,1995 855 Black T-5R,1996 960,1997 855 R
-
Tuesday 21st April 2009, 23:49 #7Senior Member
...here we go again...
- Join Date
- Oct 2004
- Location
- Kent
- Posts
- 5,337
- Thanks
- 1,075
Thanked 1,393 Times in 1,068 PostsI did this last summer. Can't believe it's taken me so long. No problem! Originally Posted by Tomcat
2014 V60 Polestar 6spd Auto :: Polestar map peak boost 17.4psi :: IPD 3" DP + 150cel :: Polestar 2.5" exhaust :: Paddle Shift Geartronic :: Black glass :: Maxton Splitter :: K+N Filter :: IPD Aluminium Top engine mount :: Brembo 6 pots :: 20" Polestar rims :: Brembo 371mm floating discs :: Sensus RTi + DAB + BT + WIFi :: D3S XENARC 6000k Active bending headlights
-
Wednesday 22nd April 2009, 08:26 #8Senior Member
This user has no status
- Join Date
- Aug 2004
- Location
- Midlands UK
- Posts
- 3,706
- Thanks
- 374
Thanked 678 Times in 255 PostsThe Carlsberg of how-too's
 thanks Lee.
-
Wednesday 22nd April 2009, 09:14 #9New Identity
Back in an AWD....Oh the grip!
- Join Date
- Dec 2006
- Location
- West Midlands
- Posts
- 8,921
- Thanks
- 2,491
Thanked 2,582 Times in 2,051 PostsThe gaitor is not available on its own (according to Rufe) You can only buy the propshaft as a whole.
1996 Olive Green 850 AWD - Follow the Project - Forged rods, 19T, big blue injectors, 960 TB, 3.25" MAF, Ostrich, 608 binary, arduino data display, active exhaust control with Focus RS tips, 320mm front brake conversion.
1996 Nautic Blue 850 AWD - Failed its MOT, now it's a donor for the green thing.
2004 Sapphire Black S60 D5 - The new daily hack.
-
Wednesday 22nd April 2009, 20:38 #10Senior Member
...here we go again...
- Join Date
- Oct 2004
- Location
- Kent
- Posts
- 5,337
- Thanks
- 1,075
Thanked 1,393 Times in 1,068 Posts That sucks...expensive gaitor then! Originally Posted by bomb192uk
2014 V60 Polestar 6spd Auto :: Polestar map peak boost 17.4psi :: IPD 3" DP + 150cel :: Polestar 2.5" exhaust :: Paddle Shift Geartronic :: Black glass :: Maxton Splitter :: K+N Filter :: IPD Aluminium Top engine mount :: Brembo 6 pots :: 20" Polestar rims :: Brembo 371mm floating discs :: Sensus RTi + DAB + BT + WIFi :: D3S XENARC 6000k Active bending headlights
That sucks...expensive gaitor then! Originally Posted by bomb192uk
2014 V60 Polestar 6spd Auto :: Polestar map peak boost 17.4psi :: IPD 3" DP + 150cel :: Polestar 2.5" exhaust :: Paddle Shift Geartronic :: Black glass :: Maxton Splitter :: K+N Filter :: IPD Aluminium Top engine mount :: Brembo 6 pots :: 20" Polestar rims :: Brembo 371mm floating discs :: Sensus RTi + DAB + BT + WIFi :: D3S XENARC 6000k Active bending headlights
-
Wednesday 22nd April 2009, 22:29 #11Senior Member
This user has no status
- Join Date
- Jul 2005
- Location
- London
- Posts
- 139
- Thanks
- 13
Thanked 13 Times in 10 Posts
Thanks Lee
You are a star for that write up.
Many Thanks mate.
Karl
-
Friday 24th April 2009, 23:50 #12Senior Member
This user has no status
- Join Date
- Jun 2005
- Location
- Bettystown - Ireland
- Posts
- 139
- Thanks
- 20
Thanked 7 Times in 3 Posts
Terrific write up Lee, thanks for going to the trouble.
All the best
Patrick2000 V70 R AWD Laser Blue, Phase III Classic 1 of 33
-
Tuesday 19th May 2009, 19:08 #13Senior Member
...here we go again...
- Join Date
- Oct 2004
- Location
- Kent
- Posts
- 5,337
- Thanks
- 1,075
Thanked 1,393 Times in 1,068 Posts
Cheers for all your comments guys and gals!
 2014 V60 Polestar 6spd Auto :: Polestar map peak boost 17.4psi :: IPD 3" DP + 150cel :: Polestar 2.5" exhaust :: Paddle Shift Geartronic :: Black glass :: Maxton Splitter :: K+N Filter :: IPD Aluminium Top engine mount :: Brembo 6 pots :: 20" Polestar rims :: Brembo 371mm floating discs :: Sensus RTi + DAB + BT + WIFi :: D3S XENARC 6000k Active bending headlights
-
Tuesday 19th May 2009, 23:45 #14Senior Member
This user has no status
- Join Date
- Apr 2005
- Posts
- 556
- Thanks
- 4
Thanked 18 Times in 16 Postsit is nice. when folks take the time to do stuff like this. thanks.
-
Tuesday 19th May 2009, 23:53 #15New Identity
Back in an AWD....Oh the grip!
- Join Date
- Dec 2006
- Location
- West Midlands
- Posts
- 8,921
- Thanks
- 2,491
Thanked 2,582 Times in 2,051 PostsThink I've found a company that will do replacement propshaft joints and boots for the awd.
Need to confirm sizes though.
http://www.merlinmotorsport.co.uk/GK...296/index.html1996 Olive Green 850 AWD - Follow the Project - Forged rods, 19T, big blue injectors, 960 TB, 3.25" MAF, Ostrich, 608 binary, arduino data display, active exhaust control with Focus RS tips, 320mm front brake conversion.
1996 Nautic Blue 850 AWD - Failed its MOT, now it's a donor for the green thing.
2004 Sapphire Black S60 D5 - The new daily hack.
-
Tuesday 25th May 2010, 20:06 #16Member
This user has no status
- Join Date
- Oct 2008
- Location
- Wiltshire
- Posts
- 48
- Thanks
- 11
Thanked 19 Times in 13 PostsHi All,
Firstly, my thanks to Lee for the brilliant original write up - I wouldn't have even attempted this job if it weren't for your article.
I thought it might be of some use if I updated this post with my latest findings as of today; my propshaft is currently dismantled on a bench at work awaiting spares.
In addition to the above comments, I can now add the following info (Based on my 1999 / 2000 MY V70R): -
1. There is no need to lift the entire car off the ground; I did it by lifting the right hand side only and supporting on axle stands. (An assistant is a good idea as you'll need to lock and release the prop for each of the six FWD bolts).
2. The FWD Coupling that Volvo say you can buy from them (for lots of £££) is the same as the Rear. - So by definition both can be replaced.
3. Both the FWD and Rear couplings can be removed (By removing the Cir-Clip Lee Circled in Yellow) and the use of a puller (one of mine needed pulling; the other was removed by hand).
4. The FWD & Rear Shroud and Rubber Gaiters can be replaced separately (No need to buy the complete Volvo front Kit).
5. Provided all of the components used are fitted correctly and, I would recommend with new bolts from Volvo (Make sure they are all the same length per coupling) - No balancing would be required.
6. The bad news, I still cannot find anyway of replacing the centre bearing or UJ without sending the prop away. But mine are both fine after 124k miles.
PARTS: -
http://www.baileymorris.co.uk/pdf/bm_catalogue.pdf
http://www.baileymorris.co.uk/contact_us.asp
The parts are currently listed on p.207 of the catalogue. But the key items are listed below. The top three items are the bearing assemblies and the bottom three are the rubber shroud / gaiters. All parts listed can be identified by the LOBRO number on the bearing outer casing (Can be seen with the prop on the car)
VOLVO
BMCV15 VOLVO CV JOINT (78MM O/A - 65MM PCD) USE WITH DL1418-78B LOBRO REF
BMCV11 VOLVO CV JOINT (86MM O/A - 74MM PCD) USE WITH DL1418-86B
LOBRO REF # 7153050177001
BMCV14 VOLVO CV JOINT (94MM O/A - 80MM PCD) USE WITH DL1418-94B
LOBRO REF # 7153100177006
DL1418-78B VOLVO CV SHROUD & RUBBER (USE WITH BMCV15)
DL1418-86B VOLVO CV SHROUD & RUBBER (USE WITH BMCV11)
DL1418-94B VOLVO CV SHROUD & RUBBER (USE WITH BMCV14)
For an Idea of prices, mine has the 7153050177001's fitted, the bearings are about 85 quid + Vat each, and the Shrouds are about 15 quid + Vat each.
The bolts are about 60 pence each + Vat from Volvo (The dealer will need the length of the bolts to order, so you'll need to measure first).
Delivery from Bailey Morris was about 10 quid and that's for TNT Next day.
Total cost for my prop £60 (not reassembled and fitted yet! but fingers crossed).
Hope this updated info helps someone else.
Ade.Laser Blue 2000MY V70R (Phase 3) awd, Rica 330, 04 C70 front, Goodridge Hoses - Now up for Sale as of 15th April 2013 - pm me for info.
-
The Following 3 Users Say Thank You to v70rade For This Useful Post:
britten_mark (Tuesday 25th May 2010),darowi (Friday 1st October 2010),LeeT5 (Wednesday 23rd June 2010)
-
Monday 2nd August 2010, 17:15 #17Junior Member
This user has no status
- Join Date
- Jul 2010
- Posts
- 18
- Thanks
- 0
Thanked 2 Times in 1 Postprop gone,help please
just found some prop problems on my v70r. this thread helps explain an awful lot, however...mechanic has just reported that i have front bearing gone,centre prop mount gone and possibly uj,s. Now if that is all that is wrong then i would be quite happy to remove the propshaft and get these things fixed by a specialist prop shop( i have already found one in Luton), firstly do the things above mean that i will have any trouble removing the prop, the broken mount being my main concern,and also roughly how much do you think those 3 items will be to repair,250-300 quid i can live with but any more than that and i may attempt doing it myself. cheers for any help. Shame , was gonna get it remapped this week , that,ll have to wait now.
-
Friday 1st October 2010, 17:12 #18Junior Member
This user has no status
- Join Date
- Sep 2010
- Posts
- 1
- Thanks
- 2
Thanked 0 Times in 0 PostsGood thread!

I tried to pull my propshaft yesterday in order to overhaul my bevel gear. Sadly before i have found this nice thread!
The outer bearing case is corroded to the angel gear flange, and without knowing where to disconnect the cv I accidently pulled the inner cage out of the assambly having the balls falling out, the gaiter was destroyed also.
Has anyone bought this gaiter from the linked webshop?
My center bearing has slight play and feels ver dry. I have got a prize of about 300 gbp for the repair here in Germany,
is that a good prize?
-
Friday 1st October 2010, 19:28 #19New Identity
Back in an AWD....Oh the grip!
- Join Date
- Dec 2006
- Location
- West Midlands
- Posts
- 8,921
- Thanks
- 2,491
Thanked 2,582 Times in 2,051 PostsOne of the members on here had their centre bearing refurbed for around £150 I think
1996 Olive Green 850 AWD - Follow the Project - Forged rods, 19T, big blue injectors, 960 TB, 3.25" MAF, Ostrich, 608 binary, arduino data display, active exhaust control with Focus RS tips, 320mm front brake conversion.
1996 Nautic Blue 850 AWD - Failed its MOT, now it's a donor for the green thing.
2004 Sapphire Black S60 D5 - The new daily hack.
-
The Following User Says Thank You to Dangerous Dave For This Useful Post:
darowi (Sunday 3rd October 2010)


 Reply With Quote


 1996 Volvo 850 AWD
 2011 Volvo 850R
 My 960
 Jurgen


Thread Information
Users Browsing this Thread
There are currently 1 users browsing this thread. (0 members and 1 guests)
 Posting Permissions

Bookmarks