


I've just this minute changed the tie bar mount (small bush) for a a Powerflex uprated mount and thought i'd pull this 'how to' together - I was swapping the bush into a brand new tie bar so i had to cut the existing rubber out - depending on the condition of your existing mount - you may or may not need to cut it out - if you do i strongly recommend a Dremel/Dremel type device with a drill/cutting bit and also a sanding bit.
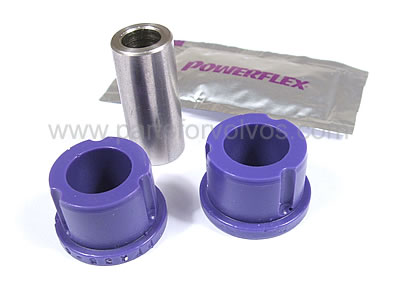
Powerflex tie bar bush (small):
I bought my bush from Parts For Volvo's.. the box stated it was for an S60 and Powerflex only list the S60 part on their website - so I called PFV and they confirmed it was the same part for pretty much every Volvo! lol!..
Tools required/used:
14mm socket
14mm spanner
Dremmel (strongly recommended) or power drill
STEP 1:
Using your socket and spanner, undo the bolt that passes through the middle of the smaller mount.
STEP 2:
Using your Dremel or other cutting tool of choice - carefully cut away the existing rubber mount - be careful not to damage the outer casing. This mount appears to be set in place and not pressed in like other mounts - so their is no quick way to do this (i.e. no reinforced plastic casing to cut) - just take your time and be methodical.
STEP 3:
After I removed the majority of the old rubber mount and the centre metal sleeve - I switched to a sanding bit on my Dremel and worked round the rest of the mount removing any residual debris.
STEP 4:
Take the supplied copper grease and smear a thin film in the inside of the mount. Insert one half of the Powerflex bush into the mount and then insert the other half of the mount. Smear a thin film of copper grease onto the metal sleeve and then press this through Powerflex bush.
STEP 5:
Reassemble Poweflex bush in tie bar and tighten bolt using your 14mm spanner and 14mm socket.
JOB DONE!..
Results 1 to 8 of 8
-
Saturday 13th September 2008, 13:15 #1Senior Member
 This user has no status
- Join Date
- Jul 2008
- Location
- Edinburgh
- Posts
- 1,352
- Thanks
- 411
Thanked 194 Times in 163 PostsGuide to replacing tie bar mount (small bush)

1998 BMW Z3 2.8 Roadster
-
Saturday 13th September 2008, 13:17 #2Senior Member
This user has no status
- Join Date
- Jul 2008
- Location
- Edinburgh
- Posts
- 1,352
- Thanks
- 411
Thanked 194 Times in 163 PostsI've also ordered the larger bush from IPD which comes with fitting instructions (link on their site for anyone who is interested): http://www.ipdusa.com/uploads/sku_files/12766_INST.PDF
It's quite strange how Powerflex or IPD don't make both bushes?.. lol!.. looks like my tie bar is going to be an IPD/Powerflex hybrid!
1998 BMW Z3 2.8 Roadster
-
Saturday 13th September 2008, 13:37 #3Senior Member
Gizza job!
- Join Date
- Jul 2008
- Location
- The 1980's
- Posts
- 1,068
- Thanks
- 161
Thanked 417 Times in 315 PostsLet us know what difference you feel once you get out in the car!
-
Saturday 13th September 2008, 13:41 #4Senior Member
This user has no status
- Join Date
- Jul 2008
- Location
- Edinburgh
- Posts
- 1,352
- Thanks
- 411
Thanked 194 Times in 163 Postswill do!.. although i'm replacing all of the other mounts at the same time as well! lol!.. Originally Posted by Yosser

1998 BMW Z3 2.8 Roadster
-
Sunday 23rd November 2008, 18:01 #5Senior Member
This user has no status
- Join Date
- Jul 2008
- Location
- Edinburgh
- Posts
- 1,352
- Thanks
- 411
Thanked 194 Times in 163 Postsok - got the car back on Friday with all all my new bits fitted and a full service/Stage 0. Originally Posted by Yosser
First impressions are the car is now VERY solid. I've noticed a slight increase in engine noise in the cabin - but not to the same extent as when the top torque arm bush was done. It feels a lot better driving/cornering as well - quite hard to explain but not as 'slushy'/soft as it was before - probably due to the weight of the engine being properly anchored down! I also noticed that the gear stick would move sometimes when I accelerate and decelerate (back and forward) - this no longer happens. Gear changes are also VASTLY improved from what they were.
I would recommend getting both bushes done as they aren't much money and are prone to wear on our cars. I had to make a hybrid affair with a Powerflex bush for the small mount and an IPD bush for the larger mount. Which works really well! - although I think Redbrick said that PFV no do Powerflex bushes for both the large and small bush.
1998 BMW Z3 2.8 Roadster
-
Sunday 23rd November 2008, 18:04 #6Senior Member
OH DEAR
- Join Date
- Jul 2008
- Location
- barnsley s.yorkshire
- Posts
- 12,470
- Thanks
- 2,138
Thanked 3,711 Times in 2,752 Postscheers paul its a very helpfull link with pics im sure you will have helped many ppl out with this top man A*********************

-
The Following User Says Thank You to t5 pete For This Useful Post:
pangster (Sunday 23rd November 2008)
-
Sunday 23rd November 2008, 18:16 #7Senior Member
This user has no status
- Join Date
- Jul 2008
- Location
- Edinburgh
- Posts
- 1,352
- Thanks
- 411
Thanked 194 Times in 163 Posts
I forgot to add the instructions for fitting the larger bush!! lol!:
I fitted the IPD bush into a brand new mount, so found it easier to drill 2 cuts (in the plastic surround) either side of the mount so it collapsed on itself and was easy to push out. The IPD mount then fitted in as per their instructions - so now I have a Powerflex/IPD combo mount! lol!
Step 1: Take your drill/dremel and cut 2 slots down the length of the bush on opposite sides:
Step 2: Clean/wipe any residue from mount:
Step 3: Fit new bush as per IPD's instructions (pretty self explanatory):
Step 4: Refit bush/mount back into tie bar arm and torque bolts:
Step 5: Refit onto car and enjoy!
EDIT: You might notice that I marked the mount and the arm with blue and red markers - this was to help with the orientation when reassembling.
Sorry about the quality of pics as they were taken with my iPhone!
1998 BMW Z3 2.8 Roadster
-
The Following 2 Users Say Thank You to pangster For This Useful Post:
billnbenT5 (Monday 16th March 2015),volvolised (Sunday 23rd November 2008)
-
Sunday 23rd November 2008, 18:18 #8Senior Member
This user has no status
- Join Date
- Jul 2008
- Location
- Edinburgh
- Posts
- 1,352
- Thanks
- 411
Thanked 194 Times in 163 Posts thanks pete! Originally Posted by t5 pete
1998 BMW Z3 2.8 Roadster


 Reply With Quote


Thread Information
Users Browsing this Thread
There are currently 1 users browsing this thread. (0 members and 1 guests)
 Posting Permissions

Bookmarks