


Thought i'd pull this together to try and help other people look at doing this - prior to starting so they can be prepared and not run into any of the problems i encountered as there is some conflicting surrounding this on the forums (as i discovered half way through! lol!)
This guide covers replacing the bush from the factory fitted item to a Powerflex upgraded poly bush on a Pre ME7 engine - so basically 850, C/S/V70 up to 1998.
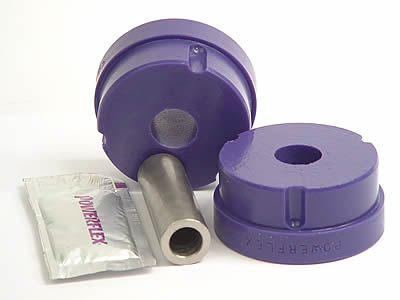
Picture of Powerflex bush for reference (easily identifiable as a Prev ME7 bush as its purple and the ME7 bush is yellow):
I changed my bush with the bush mount in the car - but in hindsight i may have taken the time to remove this from the car first as it may have saved some time/stress in the long run!
Tools you'll need:
Club hammer
Large screwdriver/chisel
Long bolt
Large square washers/large round washers
G-clamp
13 mm socket and torque wrench
15 mm spanner
Stanley knife/sharp craft knife
Sand paper/emery paper or sanding attachment for Dremel
Junior hacksaw/mini saw
Wire brush
Needle file
STEP 1 - REMOVING THE OLD MOUNT:
Your old/existing bush will need replacing if it looks like this:
In time and due to the stresses placed on it the stock bush begins to split and the centre becomes detached from the re-enforced plastic casing - in the above pic you can probably just make out my bush is split straight through (top and bottom)
1.0 Take the 15 mm spanner and 13 mm socket and remove the nut and bolt that goes through the mount (keep this nut and bolt safe as you'll be reusing this later)
1.1 Slacken the bolt on the bulkhead end of the cage (on the underside) - there is no need to completely remove this bolt as if it is slack it will provide enough movement of the cage
1.2 Lift the cage up from the mount end and place on top of the bush mount out of the way (lift it up and push it towards the drivers side)
1.3 If your bush is in pretty bad shape (as mine was) the centre section came out and and just left the outside pressed into the bush mount - take your hacksaw/hacksaw blades and make 2 cuts in the reinforced plastic mount about and inch/inch and a half apart - stop cutting as soon as you are through the plastic! - don't cut into the metal!
1.4 Take your club hammer and large screwdriver/chisel and tap out the section you have just cut - with any luck the rest of the mount will collapse in on itself - if not then you will need to work round with your hammer and screwdriver/chisel and systematically separate the bush from the mount
PICTURES OF OLD MOUNT REMOVED:
STEP 2 - PREPARING MOUNT/BUSH FOR INSTALL:
2.0 Take your wire brush and clean the mount out of any debris
2.1 Open the supplied packet of copper grease and smear a thin film all around the inside of the mount
2.2 Take the half of the Powerflex bush you intend to fit on the drivers side (the flat side of the mount and not the tapered side) and carefully with your stanley knife trim the edge to chamfer it slightly
2.3 At this stage i also smoothed the edge i cut on the mount with my Dremel with sanding bit attached:
2.4 Clean the mount of any debris left from cutting/sanding
2.5 Smear both halves of the mount with a thin film of copper grease as well as the metal core
STEP 3 - INSTALLING THE NEW BUSH:
3.0 Tap the metal core into the drivers side half of the bush
3.1 Offer the drivers side (with metal core) up to the mount
3.2 Offer the passenger side bush up to the mount
3.3 Take your long bolt and place one of your large washers on the passenger side and feed it through the mount - once through the mount place the remaining washer on the drivers side
3.4 Take your G-clamp and position suitably on your large washers/spreader plates and wind in
3.5 Both halves of the bush should now press into place
3.6 Remove long bolt and large washers
3.7 In theory the cage should now slip over the bush - but i've heard mixed experiences on this - mine didn't and it was at this stage that i realised that the lips on the bottom side of the cage were catching on the bush as shown in the picture below:
There was physically no way that the cage/arm would slip down onto the bush - faced with some suggestions which included trying to rock the cylinder head forward or removing the arm or nicking the lip off slightly with a hacksaw - i opted to cut a few mm of the lip from the drivers side off. Once i cut the lip off (about 4/5 mm at most) i then filed down the rough edge and the arm slid down (still with some resistance! lol!) over the bush.
3.8 Take your old bolt and feed through from the passenger side - wind the nut on by hand and then take your 13 mm socket and 15 mm spanner and tighten to 35Nm
3.9 Job done!
In hindsight, if i was to do it again - i would have removed the mount entirely from the engine and pressed the bush in - it is possible to do it whilst in place - but it can turn out to be a proper PITA - it shouldn't be too much of a problem as long as you are prepared though!
Results 1 to 16 of 16
-
Friday 11th July 2008, 20:06 #1Senior Member
 This user has no status
- Join Date
- Jul 2008
- Location
- Edinburgh
- Posts
- 1,352
- Thanks
- 411
Thanked 194 Times in 163 PostsGuide to replacing top engine mount
-
-
Friday 11th July 2008, 20:44 #2Senior Member
This user has no status
- Join Date
- Feb 2006
- Location
- manchester
- Posts
- 3,188
- Thanks
- 628
Thanked 387 Times in 366 Poststhanks for the info very useful

-
Friday 11th July 2008, 21:44 #3Senior Member
This user has no status
- Join Date
- Jul 2008
- Posts
- 218
- Thanks
- 11
Thanked 36 Times in 32 PostsSorry to hijack your thread but if i could provide these later type of top mounts petrol/diesel and lower arms with the bushing removed ready for the poly bushes would people be interested.
see pics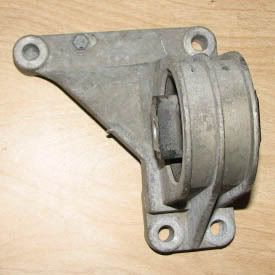

Gazbak1
-
Sunday 20th July 2008, 19:10 #4Senior Member
in dilema near ilford
- Join Date
- Jul 2008
- Location
- Ilford Essex
- Posts
- 1,000
- Thanks
- 72
Thanked 116 Times in 103 Posts powerflex mount
Did'nt go much on cutting the top mount to accomadate new bush,although fitting bush in mount was no real drama long chunky bolt couple large washers job done.However my nightmare started when trying to loosen the mount from the engine to be able to fit top rail correctly arghhhhhhhhhhhhhhhhhhhhhhhhhhhhhhhhhhhhhhhhhhhhhhh hhhhhhhhhhhhhhhhhhhhhhhhhhhhhhh ****%$£"&&*** and various other expletives
Last edited by Tomcat; Sunday 20th July 2008 at 20:34. Reason: We don't need the full 'how too' posting again ta..
-
Sunday 20th July 2008, 19:55 #5Senior Member
This user has no status
- Join Date
- Feb 2005
- Posts
- 3,111
- Thanks
- 201
Thanked 528 Times in 448 PostsIf you put the two halfs of the bush in first then press the center sleeve through the middle there should be no need to chamfer the bushes.
-
Sunday 20th July 2008, 19:58 #6Senior Member
This user has no status
- Join Date
- Jul 2008
- Location
- Edinburgh
- Posts
- 1,352
- Thanks
- 411
Thanked 194 Times in 163 Poststhere definately seems to be some variance either in the bush diameter or the housing diameter as some have problems (as i did) and others don't.. Originally Posted by nobananas


1998 BMW Z3 2.8 Roadster
-
Sunday 20th July 2008, 20:03 #7Senior Member
This user has no status
- Join Date
- Feb 2005
- Posts
- 3,111
- Thanks
- 201
Thanked 528 Times in 448 PostsMore then likely but I've always found (as with the poly TCA bushes) that pushing a small diameter sleeve into a hole is a lot easier than pushing a large diameter bush into a hole. (insert smutty comment here LOL) Originally Posted by pangster
-
Wednesday 23rd July 2008, 18:57 #8Senior Member
in dilema near ilford
- Join Date
- Jul 2008
- Location
- Ilford Essex
- Posts
- 1,000
- Thanks
- 72
Thanked 116 Times in 103 Posts powerflex mount
Well tis finally fitted and all back together.All i can say is why bother? A real pain in the a*** to fit mainly getting the top rail back on,ok bit more of a growl when you give it a bit of welly some strange noises on startup up and switch of also on tickover guess being more ridgid it will transfer more noise etc through dash.Really dont think i'd bother again.Only good thing that came out of it was it made me replace pcv as pipes that run round to the right of engine by engine mount broke when trying to undo the 3 bolts that hold it to engine,clearly because they had gone brittle with age so clearly needed changing.
-
Wednesday 23rd July 2008, 19:00 #9Senior Member
This user has no status
- Join Date
- Jul 2008
- Location
- Edinburgh
- Posts
- 1,352
- Thanks
- 411
Thanked 194 Times in 163 Poststhe main reason i changed mine was because it needed doing and i didn't see the point of putting on a stock Volvo replacement that are prone to failing anyway! lol!.. Originally Posted by 5seaterT5x2
1998 BMW Z3 2.8 Roadster
-
Wednesday 23rd July 2008, 19:20 #10Moderator
This user has no status
- Join Date
- Nov 2005
- Location
- The Shire
- Posts
- 2,635
- Thanks
- 1,197
Thanked 660 Times in 489 Postsgreat walk through guide , very helpfull
thanks

-
Wednesday 23rd July 2008, 19:24 #11Senior Member
This user has no status
- Join Date
- Jul 2008
- Location
- Edinburgh
- Posts
- 1,352
- Thanks
- 411
Thanked 194 Times in 163 Postsno problem! - best going into these things with your eyes open! lol! Originally Posted by y2blade
1998 BMW Z3 2.8 Roadster
-
Wednesday 23rd July 2008, 20:06 #12Senior Member
This user has no status
- Join Date
- Jul 2008
- Location
- Cumbernauld, Glasgow.
- Posts
- 296
- Thanks
- 4
Thanked 24 Times in 23 Posts
Been there, done that! what about the firewall bush? it costs a fortune to buy/import the uprated version, more to send, sometimes twice the cost of the product!!!! i know someone bought a similar polybush and cut the steel insert to length while drilling the centre hole from an 8mm to a 10mm if memory serves me correctly? shurely some euro tuner has a replacement for this, as i'm sure i'm not the only one that needs to replace this!!!!!!!!! as for the noise increase, you ether love it or love it!!!!!!!!
-
Saturday 30th August 2008, 16:45 #13Senior Member
This user has no status
- Join Date
- Oct 2005
- Location
- Newcastle-upon-Tyne
- Posts
- 150
- Thanks
- 9
Thanked 8 Times in 8 PostsTop advice Pangster! Done mine yesterday. Using a G-clamp was a master stroke
Definitely recommend taking off the mount bar though, only problem is that the bolt is almost directly in line with some pipes running out of the bulkhead (air con?). Just (carefully) pry it across to the side so you can get the bolt head past.
Cheers!Bob
850 T5 saloon
Powerflow Exhaust | Drilled & Grooved disks (rear) | ABS ECU repaired | Alloys refurbed | Strut brace fitted | Poly Top engine bush | Replaced front quarter panel | Replaced Front Passenger Door |PCV system replaced | ITG Panel filter | New radiator fitted | 302mm Drilled & Grooved disks (Front) | EBC Pads | Drop links |VPCUK Sticker
-
Sunday 31st August 2008, 21:07 #14Senior Member
This user has no status
- Join Date
- Jul 2008
- Location
- Edinburgh
- Posts
- 1,352
- Thanks
- 411
Thanked 194 Times in 163 Poststhanks! - it's a guide on how i did it and to make sure people went into this with their eyes open! lol!.. there are probably better ways of doing it.. but at least you get the idea! Originally Posted by Diesel64
1998 BMW Z3 2.8 Roadster
-
Saturday 13th September 2008, 16:49 #15Senior Member
This user has no status
- Join Date
- Jul 2008
- Location
- Edinburgh
- Posts
- 1,352
- Thanks
- 411
Thanked 194 Times in 163 Postshere's a link to replacing the small bush on the tie bar with a Powerflex item:
http://www.vpcuk.org/forums/showthread.php?t=17411
It's really straight forward though. I'll be replacing the larger bush in the tie bar with a poly IPD item as well so the tie bar will be completely poly bushed as well as these are also prone to fail..
1998 BMW Z3 2.8 Roadster
-
Wednesday 17th September 2008, 16:33 #16Senior Member
This user has no status
- Join Date
- Jul 2008
- Location
- The Future and West Sussex
- Posts
- 136
- Thanks
- 3
Thanked 17 Times in 17 PostsA very helpful thread.
The later type of top mount housings as in gazback1's reply make the job very straight forward. Having applied grease to the new bushes, they went in with just a light tap with a hammer. Removing the top mount housing makes the job of removing the old rubber bush a whole lot easier.I'll be baaak! Hasta La Vista, Baby!
Volvo V70R AWD 1999


 Reply With Quote

 1995 YAMAHA FZX 750 FAZER
 2001 Honda ST1100
 Nooooooooooooooooooo lol


Thread Information
Users Browsing this Thread
There are currently 1 users browsing this thread. (0 members and 1 guests)
 Posting Permissions

Bookmarks