


I finally got round to sorting my interior out - so thought I'd do a quick write up.
I ordered my Liquid Leather Scuff Master treatment kit from http://www.liquidleather.com - in the order form or if you call you specify the make, model and year of car as well as colour of leather. They then send you out the kit pre-mixed to a sample they hold on file. If you have any reservations about colour matching then you can always send them a small sample of your leather and they'll match it for you - although in the kit you do get 2 small bottles of toners to make up for any slight variations.
Here's a picture of what you get in the kit as well as some other items you might find useful for this job:
Kit contents:
GT12 Liquid Leather Cleaner
GT11 Liquid Leather Conditioner
Scuff Master Touch Up Kit (contains 1 x bottle of premixed dye, 1 x light toner, 1 x dark toner, 1 x gloss enhancer and 2 x sponge applicators)
In addition to the supplied kit you might also want to consider the following:
Rubber/latex gloves (if it can dye leather I'm pretty sure it can dye skin! lol!!)
Small artist paintbrush or cocktail stick (for application of neat dye)
Cotton cloths/rags
Methylated spirits
Small plastic bowl
Step 1:
Hoover your interior and seats
Step 2:
Clean all of your leather interior thoroughly with the supplied GT12 Liquid Leather Cleaner. You can use a small nail brush or old toothbrush to agitate the cleaner on stubborn areas and then make sure you clean off all the residue and leave to dry.
Step 3:
Once dry - wipe down the seats/interior with a mild solvent like methylated spirits and dry.
Step 4:
Take your pre mixed Scuff Master dye and apply neat to a small crack/scuff with your cocktail stick/brush and wait for it to dry. Once dry inspect to see how accurate colour match is and add toner to adjust accordingly. Once you are happy with the colour match proceed to paint in the remaining cracks - I found that this worked best by working along the creases and not try to over paint areas that shouldn't have dye applied. The same applies to scuffs - apply a slightly diluted mix (10-20% water) to the scuffs with the sponge applicator.
Step 5:
Leave the dye to dry for around 1 minute then wipe off with a damp cloth (work along the direction of the cracks/scuff) and repeat Step 4 if necessary. Once you are happy all of the scuffs/cracks have been dyed then move onto Step 6.
Step 6:
Prepare a colour wash for the treated seat - for my first colour wash I mixed around 80% dye with 20% water and applied this over the seat. Again I let this dry and then rubbed down with a damp cloth. I was quite happy with the match/balance of the colour at this stage so mixed my final colour wash which consisted of around 20% dye and 80% water and added a little drop of the gloss enhancer I received with the kit. This colour wash was then applied to the seat and I left it to dry (24 hours).
Step 7:
Take the GT11 Leather Conditioner and work this into your leather until it is completely absorbed. The aim here is to apply an even coat and make sure you work the conditioner completely into the leather. Areas which are particularly dry may require repeated application - just be patient and make sure it is worked in properly.
Step 8:
Job done!- with any luck your interior should look something like mine!

Results 1 to 20 of 21
-
Friday 11th July 2008, 19:27 #1Senior Member
 This user has no status
- Join Date
- Jul 2008
- Location
- Edinburgh
- Posts
- 1,352
- Thanks
- 411
Thanked 194 Times in 163 PostsRestoring leather interior (Liquid Leather)
-
The Following User Says Thank You to pangster For This Useful Post:
iancho (Sunday 14th July 2013)
-
Friday 11th July 2008, 19:29 #2Senior Member
This user has no status
- Join Date
- Jul 2008
- Location
- Edinburgh
- Posts
- 1,352
- Thanks
- 411
Thanked 194 Times in 163 Postssome more pics of before and after:
BEFORE:


AFTER:


-
Friday 11th July 2008, 20:50 #3Senior Member
This user has no status
- Join Date
- Feb 2006
- Location
- manchester
- Posts
- 3,188
- Thanks
- 628
Thanked 387 Times in 366 Postsgoing to order some

-
The Following User Says Thank You to abdul For This Useful Post:
pangster (Friday 11th July 2008)
-
Friday 11th July 2008, 21:01 #4Senior Member
This user has no status
- Join Date
- Jul 2008
- Location
- Edinburgh
- Posts
- 1,352
- Thanks
- 411
Thanked 194 Times in 163 Postsi had posted this on the site post crash and thought it was worth reposting! lol!!.. Originally Posted by abdul


1998 BMW Z3 2.8 Roadster
-
Thursday 29th March 2012, 21:09 #5Senior Member
Keeping it looking stock
- Join Date
- Mar 2012
- Location
- Newton abbot, Devon
- Posts
- 5,567
- Thanks
- 920
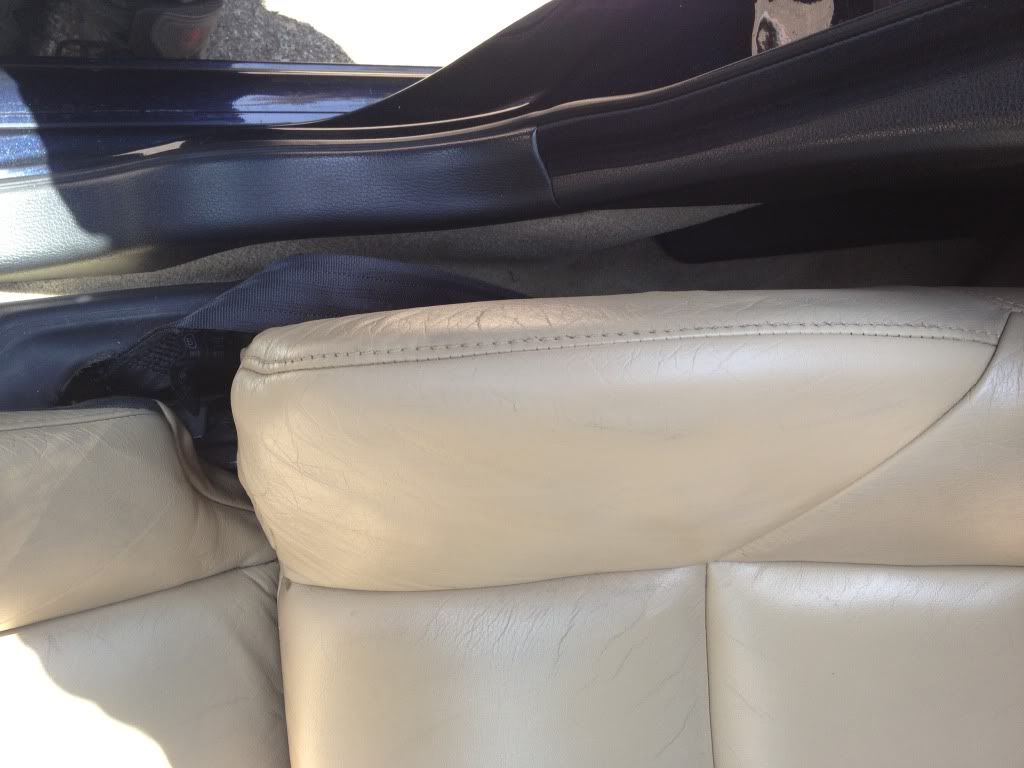
Thanked 1,581 Times in 1,296 Postsworn drivers seat leather
Hi just to add a couple of photos of my drivers seat before & after.
I was amazed at the change for just a couple of hours work,and not hard at all. Only did the bolster panel which was worn not the hole seat not bad at all.
Harvey
-
The Following User Says Thank You to Harvey For This Useful Post:
iancho (Sunday 14th July 2013)
-
Thursday 29th March 2012, 21:27 #6More cars than a Showroom
This user has no status
- Join Date
- Jul 2008
- Location
- Cruden Bay (Scotland)
- Posts
- 6,355
- Thanks
- 1,464
Thanked 1,624 Times in 1,141 Posts That's great, did you use a sanding pad first? I did mine not long ago Originally Posted by Harvey
Thanks
That's great, did you use a sanding pad first? I did mine not long ago Originally Posted by Harvey
Thanks
Martyn
-
Thursday 29th March 2012, 21:35 #7Senior Member
Keeping it looking stock
- Join Date
- Mar 2012
- Location
- Newton abbot, Devon
- Posts
- 5,567
- Thanks
- 920
Thanked 1,581 Times in 1,296 PostsHi no just used the cleaner that came in the kit then did a watered down mix for the first coat then two thin coats straight out of the bottle, then put on the conditioner the next day job done.
-
Thursday 29th March 2012, 21:53 #8Trader
This user has no status
- Join Date
- Nov 2011
- Location
- Colchester,Essex
- Posts
- 6,115
- Thanks
- 1,352
Thanked 1,665 Times in 1,419 PostsI`ve got one wiv the car,the guy who sold it had one ordered it bbut need gt11,gt12.
-
Thursday 29th March 2012, 22:09 #9Senior Member
Keeping it looking stock
- Join Date
- Mar 2012
- Location
- Newton abbot, Devon
- Posts
- 5,567
- Thanks
- 920
Thanked 1,581 Times in 1,296 PostsHi sorry the kit i got was with the cleaner,the dye/paint,then the conditioner the hole lot cost about 35 pounds.
-
Thursday 29th March 2012, 23:03 #10Senior Member
This user has no status
- Join Date
- Mar 2012
- Location
- Essex
- Posts
- 334
- Thanks
- 65
Thanked 63 Times in 51 PostsI've got one of these kits on the way.
-
Friday 30th March 2012, 19:37 #11Senior Member
Keeping it looking stock
- Join Date
- Mar 2012
- Location
- Newton abbot, Devon
- Posts
- 5,567
- Thanks
- 920
Thanked 1,581 Times in 1,296 PostsHi pound for pound it's about the best value I think I could get.
-
Saturday 28th April 2012, 14:51 #12Senior Member
Keeping it looking stock
- Join Date
- Mar 2012
- Location
- Newton abbot, Devon
- Posts
- 5,567
- Thanks
- 920
Thanked 1,581 Times in 1,296 PostsHi have you used your kit yet ?.
-
Sunday 17th June 2012, 21:02 #13Member
This user has no status
- Join Date
- Jun 2012
- Posts
- 44
- Thanks
- 7
Thanked 3 Times in 2 PostsHi, my bolsters look the same as your before pic, I've used liquid leather on bmws black before bit can you tell me what colour you ordered please. I've got ivory/beige leather in my s60.
-
Monday 18th June 2012, 10:53 #14Senior Member
Keeping it looking stock
- Join Date
- Mar 2012
- Location
- Newton abbot, Devon
- Posts
- 5,567
- Thanks
- 920
Thanked 1,581 Times in 1,296 PostsAm away for a while will post colour code when I am back. Originally Posted by imp75
Just a throught I think the colour in the Rs is not the same in the rest of the Volvo range.Last edited by Harvey; Monday 18th June 2012 at 11:04.
-
Sunday 14th July 2013, 19:34 #15Senior Member
Keeping it looking stock
- Join Date
- Mar 2012
- Location
- Newton abbot, Devon
- Posts
- 5,567
- Thanks
- 920
Thanked 1,581 Times in 1,296 Posts Originally Posted by Harvey
Just to update this gave the seats a clean & bit of conditioner and the drivers seat still looks spot on.That's about 18 months.
-
Sunday 14th July 2013, 21:39 #16Trader
This user has no status
- Join Date
- Nov 2010
- Location
- chester le street
- Posts
- 6,128
- Thanks
- 969
Thanked 1,398 Times in 1,121 Poststhat looks same colour as my seats. do you know the exact colour Originally Posted by Harvey
s60 2.4 t5 eibach springs,up rated rear anti roll bar, poly bushed wishbones, poly lower engine mount, fmic, bmc air filter, 3" decat, 2.5" stainless exhaust,hlm remap 328bhp,
-
Sunday 11th August 2013, 20:44 #17Senior Member
This user has no status
- Join Date
- Aug 2013
- Posts
- 186
- Thanks
- 0
Thanked 16 Times in 10 PostsI got this kit about 8 months ago. Not used it yet as still putting g car back together, however I have the above volvo R coloured seats. I sent them a off cut if my seat and they matched it and have that colour now on there list. Just message or call them. Use my name to remind them if u need phil reeves. I told them the year and car they came off 03 s60R.
-
Sunday 11th August 2013, 20:46 #18Senior Member
This user has no status
- Join Date
- Aug 2013
- Posts
- 186
- Thanks
- 0
Thanked 16 Times in 10 PostsPs I got the off cut from under the rear base sear. Best place as loads of over hang to cut off there. Just cut it and send it them.
-
Monday 12th August 2013, 11:37 #19Trader
This user has no status
- Join Date
- Nov 2010
- Location
- chester le street
- Posts
- 6,128
- Thanks
- 969
Thanked 1,398 Times in 1,121 Poststhe furniture clinic is going to colour match my seats for me. they are local so i get to have a nose around the shop to. prob spend more than what id planned like. but hopfully ill get some sound advise to
s60 2.4 t5 eibach springs,up rated rear anti roll bar, poly bushed wishbones, poly lower engine mount, fmic, bmc air filter, 3" decat, 2.5" stainless exhaust,hlm remap 328bhp,
-
Monday 12th August 2013, 13:03 #20Trader
No Longer a trader.
- Join Date
- Aug 2004
- Location
- Sunning it up in Chorley
- Posts
- 12,660
- Thanks
- 2,980
Thanked 2,222 Times in 1,791 PostsGoing to give this a try, both my front seats have marks and wear.
http://www.airbrushartists.org/Gal72..._s_Gallery.asp
Currently rocking Volvo's finest V70R 2WD Manual
Previous cars:
1996 855 T5 (Ex Police),1996 854 T5,1996 855 T5,1995 855 Black T-5R,1996 960,1997 855 R


 Reply With Quote
 2005 Volvo S60r
 2005 Volvo V70R

 2012 Volvo S70R
 1998 Volvo V70R
 C70 T5
 Flying Brick


 2011 Volvo 850R
 My 960
Thread Information
Users Browsing this Thread
There are currently 1 users browsing this thread. (0 members and 1 guests)
 Posting Permissions

Bookmarks