


Door window switches
Tools needed:
Wire cutters
small flat screwdriver
Heatshrink or electrical insulation tape
3mm LEDs
Soldering iron
(Some thin guage wire may be handy if you get stuck)
A V70 or similar
Step 0: Order some LEDs
I bought 50 from a nice man in Hong Kong for £1.58 plus a few quid P&P. Makes Maplins £2.50 for 2 seem a bit expensive.
Mine are 13000 thingies in brightness which in retrospect may be a little too bright.
They are 3.5v but come with 50 resistors for 12v use.
Dont try them without the resistor, the smell is nasty!
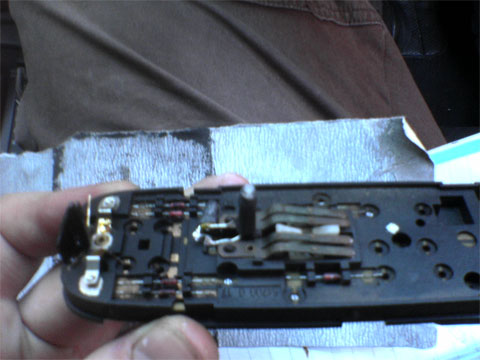
Step 1: Take apart the door switch
We are working with the passenger door switch here (more space to practice with).
Using a small flat screwdriver gently pry up the cover over the catches (circled), starting from one end and working round.
Step 2: The green LEDs
Here are the buggers on their little black towers.
Step 3: Cut the LEDs off
Cut off the window switch LED about halfway.
Cut off the lock LED near to the top. Unless you have a long, thin soldering iron it will be hard to solder the wires if they are too short.
Step 4: Its solder time (switch LED)
Solder the resistor to the LED. Marvel at my great soldering and my high-tech solder mat.
When doing the drivers side you may want to plan the length of the wires as the space is very limited but here you have room to move things about a bit.
Place the LED at the top of the tower moulding, curve the wires down and solder to the old LED wires. Cut off the excess wire. Fold the resistor out the way and insulate with heatshrink or bodge-tape. (circled) Ensure the wires will not touch the window switch components.
Bung some heatshrink over the LED and wires (putting the heatshrink on first may help hold the LED in place)
Step 5: Its solder time (lock LED)
Positioning the resistor is a little tricky here as the switch for the locks runs over the front and back of the LED. Stick it to one side, again insulating it with heatshrink.
It is worth noting at this point that you check the polarity before soldering so you dont have to unsolder & resolder (voice of experience)
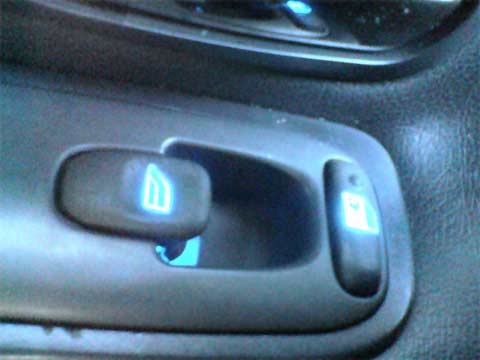
Step 6: Finished
Reassemble and marvel.
Epilogue:
There is some reflected glow under the switch. This is mainly due to the intensity of the LEDs chosen combined with the white underside of the switch. I may fix this.
For the drivers door switches you can tuck the resistor behind the LED pillar as the casing is slightly raised.
If you get LEDs with a rim at the base you may need to either sand off the rim or cut off the small tubes that are under the switch button (not pictured as they arent on the passenger side [I did the drivers side first and didnt photograph it])
Next week:
Dash switch lights (once I work out why the ones I have done are shorting out the stereo!)
Results 1 to 18 of 18
-
Thursday 21st September 2006, 22:49 #1Senior Member
 This user has no status
- Join Date
- Mar 2006
- Location
- Woking
- Posts
- 1,824
- Thanks
- 11
Thanked 129 Times in 90 PostsBlue LED switches. A pictorial journey - Pt1
Last edited by Baj; Thursday 21st September 2006 at 22:51.


-
Thursday 21st September 2006, 23:10 #2Senior Member
This user has no status
- Join Date
- May 2005
- Location
- Suffolk
- Posts
- 2,700
- Thanks
- 22
Thanked 85 Times in 61 PostsGet one with it

-
Thursday 21st September 2006, 23:13 #3Senior Member
This user has no status
- Join Date
- Mar 2006
- Location
- Woking
- Posts
- 1,824
- Thanks
- 11
Thanked 129 Times in 90 PostsGet one what with what, good sir?
-
Thursday 21st September 2006, 23:25 #4Senior Member
This user has no status
- Join Date
- May 2005
- Location
- Suffolk
- Posts
- 2,700
- Thanks
- 22
Thanked 85 Times in 61 PostsPart 2, 3, 4 and 5
-
Thursday 21st September 2006, 23:27 #5Senior Member
This user has no status
- Join Date
- Aug 2004
- Location
- Midlands UK
- Posts
- 3,706
- Thanks
- 374
Thanked 678 Times in 255 PostsI think I'm gonna change your name from Baj to Boj lol
-
Thursday 21st September 2006, 23:35 #6Senior Member
This user has no status
- Join Date
- Mar 2006
- Location
- Woking
- Posts
- 1,824
- Thanks
- 11
Thanked 129 Times in 90 PostsPlease yourselves
-
Thursday 21st September 2006, 23:44 #7Senior Member
this member hass no status
- Join Date
- Jun 2005
- Location
- Doncaster
- Posts
- 1,481
- Thanks
- 31
Thanked 76 Times in 63 Postsnice one Baj
-
Friday 22nd September 2006, 08:07 #8Senior Member
This user has no status
- Join Date
- Feb 2006
- Location
- manchester
- Posts
- 3,188
- Thanks
- 628
Thanked 387 Times in 366 Postsexcelent can we have a contact for suplier

-
Friday 22nd September 2006, 10:37 #9Senior Member
This user has no status
- Join Date
- Feb 2005
- Location
- Herts
- Posts
- 4,405
- Thanks
- 672
Thanked 887 Times in 593 PostsUseful - and I particularly liked the commentary
Alastair
Current: 2009 Cayenne GTS and a 2016 Prius IV... yes.
Previous Volvos: 2009 V50 D5 R-Design, 2005 V70R, 2001 V70 T5, 2001 S40 T4, 2x 1999 S40 T4, 2003 V40 T4, 1999 V70 T5, 1996 854 T5 & 855 T5, 1995 855 T5, and a 480...
Previous other stuff: Saxo Turbo, 2004 996 C4S, 2008 Z4M, 2001 Yaris T-Sport, 2002 S2000 Mugen, and a 1999 Evo VI
-
Friday 22nd September 2006, 13:51 #10Senior Member
This user has no status
- Join Date
- Mar 2006
- Location
- Woking
- Posts
- 1,824
- Thanks
- 11
Thanked 129 Times in 90 Postshttp://stores.ebay.co.uk/Light-of-Vi...enameZL2QQtZkm Originally Posted by abdul
Ordered Thursday, arrived Tuesday
-
Friday 22nd September 2006, 15:32 #11Senior Member
This user has no status
- Join Date
- Feb 2005
- Location
- Brighton
- Posts
- 236
- Thanks
- 0
Thanked 0 Times in 0 PostsExcellent pictorial how-to. Well done.
I might have a go at that.Robb
Silver 2001 V70 T5 ex-plod
Eibach lowered springs, Monroe Reflex shocks; 17" Almathea's shod with P6000's (eBay £50 net); Black leather interior (eBay £410)
-
Friday 22nd September 2006, 15:43 #12Senior Member
This user has no status
- Join Date
- Mar 2006
- Location
- Woking
- Posts
- 1,824
- Thanks
- 11
Thanked 129 Times in 90 PostsI accept no liability for damage to switches and or electrical systems due to dodgy soldering, resistance etc

-
Friday 22nd September 2006, 16:41 #13Senior Member
This user has no status
- Join Date
- Jun 2005
- Location
- Bettystown - Ireland
- Posts
- 139
- Thanks
- 20
Thanked 7 Times in 3 PostsBrilliant, thanks for all your efforts, great photos!
2000 V70 R AWD Laser Blue, Phase III Classic 1 of 33
-
Friday 22nd September 2006, 18:39 #14Senior Member
This user has no status
- Join Date
- Feb 2006
- Location
- manchester
- Posts
- 3,188
- Thanks
- 628
Thanked 387 Times in 366 PostsThanks For Contact
-
Friday 22nd September 2006, 19:02 #15Senior Member
This user has no status
- Join Date
- Apr 2005
- Location
- Sleepy Suffolk !
- Posts
- 1,680
- Thanks
- 28
Thanked 51 Times in 45 PostsGreat " How to Baj " ..Cheap as well......Nice.

Last edited by dicky b t5; Saturday 23rd September 2006 at 14:23.
--------------------------------------------------
 Saffy V70R Auto estate
--------------------------------------------------
-
Saturday 23rd September 2006, 09:42 #16Senior Member
This user has no status
- Join Date
- Mar 2005
- Location
- Reykjavic
- Posts
- 7,766
- Thanks
- 656
Thanked 670 Times in 487 PostsBaj you should be able to still use the dimmer control if you feel they are too bright mate

-
Saturday 23rd September 2006, 12:17 #17Senior Member
This user has no status
- Join Date
- Mar 2006
- Location
- Woking
- Posts
- 1,824
- Thanks
- 11
Thanked 129 Times in 90 PostsYeah, the dimmer will work on the dash but it wont work on the window switches.
-
Saturday 7th October 2006, 09:27 #18Senior Member
This user has no status
- Join Date
- Jan 2006
- Location
- Doncaster
- Posts
- 459
- Thanks
- 13
Thanked 11 Times in 11 Postsany update on your dash?


 Reply With Quote

 Jurgen

 1996 Volvo 850 T5 GLT


Thread Information
Users Browsing this Thread
There are currently 1 users browsing this thread. (0 members and 1 guests)
 Posting Permissions

Bookmarks